The Facebook Lead Ads testing tool is a free Meta utility at developers.facebook.com/tools/lead-ads-testing that sends fake leads through any live instant form. You select a Page and form, click Preview Form to inspect it or Create Lead to fire a dummy submission, then Track Status to confirm the lead reached your webhook or CRM. Only one test lead exists per form at a time, deleting it lets you retest, it requires an Advertiser page role, and it never spends ad budget or counts as a real lead.
A lead form that "looks fine" in the editor can still drop every submission into a void. The damage is quiet: your ad spends normally, your cost per lead looks reasonable, and three days later you discover the CRM is empty or the leads landed with the name in the email field. By then you have paid for traffic you cannot follow up on. Running a test in the Facebook lead ads testing tool is the easy half: it is mostly clicking through a preview. The job that actually protects your budget is QA: proving the form behaves correctly and the lead reaches its destination before you turn the ads on.
This guide covers where the tool lives, the exact create-preview-delete flow, the two layers of pre-launch QA that matter most, how to confirm leads reach your CRM, the Graph API for technical teams, and how to run this at volume when you are launching dozens of forms instead of one. After years of building Meta Ads workflows, I have seen more lead campaigns fail on a broken handoff than on bad creative. Testing is the cheapest insurance you will ever buy.
Where to Find the Facebook Lead Ads Testing Tool
The tool lives at developers.facebook.com/tools/lead-ads-testing. It is free, it is part of Meta for Developers, and you reach it in any browser. You do not need to build a developer app from scratch to open it, but a few permissions have to be in place first.
To use it you need:
- An Advertiser or Admin role on the Page that owns the form. Page access alone is not enough; the role has to carry advertiser permissions.
- A Facebook app associated with the Page that has lead access, set to Live mode. The leadgen system only delivers leads to apps that are live with the right permissions, so a development-mode app will not fire webhooks.
- Lead Access assigned to the Page under Business Settings, Integrations, Lead Access, including both your user account and the CRM app you intend to test.
A couple of facts worth internalizing before you start. The leads this tool creates are organic dummy leads, not attached to any ad, so they never spend budget and never show up in your Leads Center, campaign reporting, or Insights. And you can only hold one active test lead per form at a time. To run a second test on the same form, you delete the first one. That single constraint is behind a surprising share of "the tool is broken" complaints.
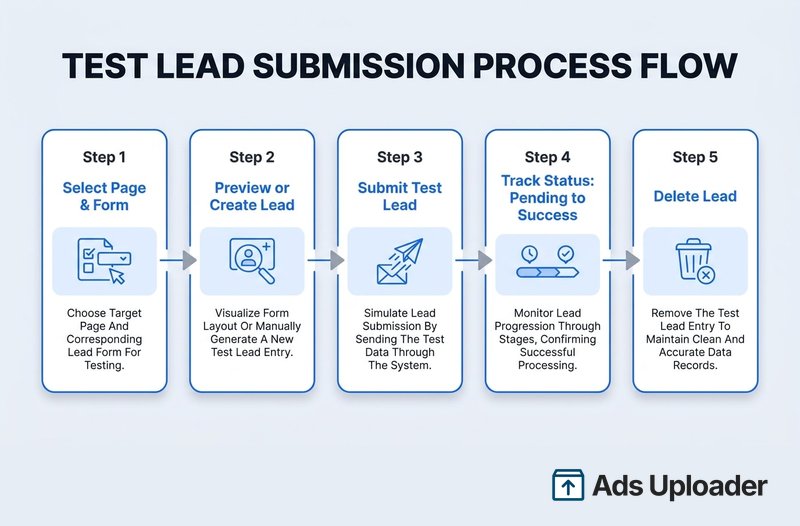
How to Create a Test Lead, Step by Step
Once your permissions are set, the flow is short:
- Select your Page, then select the form from the dropdowns. The tool shows your role and lists connected CRM apps under Integrations and Lead Access. If an app shows an orange warning icon, it lacks permission and will not receive the lead.
- Choose how to fill the form. Click Preview Form to enter realistic custom values for each question, or click Create Lead to submit generic placeholder data automatically. Preview is the better choice when you want to exercise specific answers or conditional logic.
- Submit. Clicking Create Lead fires the test submission immediately and confirms the lead has been sent.
- Click Track Status after roughly 20 to 30 seconds. The delivery status starts at Pending and moves to Success or Failed. This screen also shows the exact JSON payload Meta sent to your endpoint, which mirrors what a real lead delivers.
- Delete the test lead when you are done, using the Delete Lead button. This frees the form for another test and never affects live or ad-driven leads.
One downstream quirk to note: custom short-answer questions arrive in the webhook payload as numbered field keys (0, 1, 2, and so on) rather than friendly labels. Check how your CRM maps those, because a mislabeled field is one of the most common silent failures in lead automation.
The Two Layers of Pre-Launch QA
Here is the framing that matters. Testing a lead form is not one task, it is two, and they fail in completely different ways. Treat them separately and you catch problems the average advertiser ships straight into a live campaign.
Launch More. Click Less.
Upload hundreds of creatives at once, auto-match thumbnails to videos, and export directly to Meta Ads Manager.
Try Ads Uploader FreeNo credit card required • 7-day free trial
Layer 1: Form QA (Does the Form Look and Behave Right?)
This is the content and flow check. Use Preview Form, or create a manual test lead, and walk through the form exactly as a prospect would. You are checking:
- Intro and headline copy. Does the greeting and description read the way you intended?
- Questions and field types. Are name, email, phone, and address mapped to the right field types, and do prefilled fields populate correctly?
- Qualifying questions and conditional logic. Do custom questions, yes/no qualifiers, and disqualifiers appear only when they should? Test different answers to exercise the branches.
- Consent and disclaimers. Are your custom disclaimers, consent checkboxes, and the privacy policy URL all present? A missing privacy URL is a common rejection.
- Completion screen and CTA. Does the thank-you screen, its button text, and the follow-up action (website link, call button, or download) all point where you want?
Form QA matters most because instant forms lock after they receive their first real lead. You cannot quietly fix a typo in a qualifying question once leads start flowing, so the preview is your last clean chance to get the wording right. For the full build process behind these fields, see our guide to setting up a lead ad from scratch.
Layer 2: Delivery QA (Does the Lead Actually Arrive?)
This is where the testing tool earns its keep. A form can be flawless and still send every lead nowhere. After you create a test lead, use Track Status to confirm Meta's real-time update fired, then verify the lead landed in its destination: the form's leads list, your CRM, your automation run, or your email notification.
The Track Status payload is your debugging gold. Because the test lead triggers the same webhook as a real lead, the JSON you see is exactly what your CRM will process in production. Compare it field by field against what your CRM expects. If Track Status reads Success but nothing shows up downstream, the fault is in your integration, not in Meta's delivery, and you have just saved yourself from launching a campaign that quietly leaks every lead.

Testing Lead Delivery to Your CRM and Webhooks
Delivery QA is where most lead campaigns silently break, so it deserves its own pass. The mechanics:
- Set up your webhook first. Meta delivers leads via real-time updates to a webhook endpoint. Confirm yours is subscribed and responding before you test. Meta's Webhooks getting-started docs cover the subscription and verification steps, and there is a Test button inside the app's Webhooks dashboard for firing a sample payload.
- Watch the real-time update. In Track Status, the update moves from Pending to Success once your endpoint returns an HTTP 200. A Failed status almost always means your endpoint errored or timed out; check its logs and the error_code shown in the table.
- Mind the instant-trigger timing. Automation platforms like Zapier, n8n, and Make use instant triggers that only catch the event if the flow is actively listening at the moment the lead is created. The reliable pattern: open your automation's test mode first, then immediately click Create Lead. If you wait too long, the platform misses the sample and you wrongly conclude the integration is broken.
- Reset Lead Access if you hit error 103. A "CRM access has been revoked from Lead Access Manager" message (error 103) means your CRM app lost its assignment. Reassign it under Business Settings, Lead Access.
Delivery is the half of lead ads that breaks most often and shows the least, which is exactly why a dedicated CRM integration deserves its own test before launch rather than a hopeful check after the spend starts.
Save Hours on Creative Testing
Stop uploading ads one by one. Bulk process unlimited creatives with automatic media matching and direct API publishing.
Try Ads Uploader FreeNo credit card required • 7-day free trial
Testing Lead Forms With the Graph API
For technical teams, or anyone testing more than a handful of forms, the Graph API exposes the same functionality as the UI through the test_leads endpoint on the leadgen form node. Meta documents the full behavior in its lead ads testing and troubleshooting reference.
Create a test lead with a POST, using a Page access token tied to an Advertiser role and with no existing test lead on the form:
curl \
  -F "access_token=<PAGE_ACCESS_TOKEN>" \
  "https://graph.facebook.com/<API_VERSION>/<FORM_ID>/test_leads"
Pass custom data with field_data and, if you use consent checkboxes, custom_disclaimer_responses:
curl \
  -F "field_data=[{'name': 'email', 'values': ['test@test.com']}, {'name': 'full_name', 'values': ['John Doe']}]" \
  -F "custom_disclaimer_responses=[{'checkbox_key': 'my_checkbox', 'is_checked': true}]" \
  -F "access_token=<PAGE_ACCESS_TOKEN>" \
  "https://graph.facebook.com/<API_VERSION>/<FORM_ID>/test_leads"
Read the test leads on a form with a GET to /{FORM_ID}/test_leads, and remove one with a DELETE to /{LEAD_ID} (only the app that created the lead can delete it). Use the current stable Graph API version, and remember the same rules carry over from the UI: an Advertiser page role, an app associated with the Page, and one test lead at a time.
When should you use which? The UI is faster for a single form and gives you the visual Track Status view. The API is the right tool the moment you are testing programmatically or at volume, because it slots straight into a script.
Testing Lead Ads at Scale (Bulk QA)
The native tool tests one form at a time. That is fine when you run a single funnel. It falls apart when you are an agency onboarding ten clients, or a DTC team launching twenty creative variants each with its own form. Thirty manual testing-tool sessions is not QA, it is a way to skip QA while feeling busy.
At scale, the workflow becomes a repeatable pass rather than a one-off:
- Loop the API for delivery. Script the test_leads endpoint to walk every new form ID, POST a test lead, wait a few seconds for the webhook to fire, then GET or DELETE it. Pause briefly between forms so the real-time updates have time to land.
- Run form QA per form, delivery QA per destination. Every form still needs its content checked individually, but you only need to validate each unique CRM destination once. Separating the two keeps the work proportional instead of multiplying.
- Log every result. A test that no one recorded is a test that did not happen. Keep a per-form pass/fail record so a broken form cannot slip into a launch.
This is the loop a tool like Ads Uploader is built around: you prepare and launch Meta lead ads in bulk, then run a consistent QA pass across every form and destination so a single mis-mapped field does not quietly poison a whole batch. The point is not the tooling, it is the discipline. With a $5 to $20 cost per lead in most industries, one form that drops its leads for a week can waste a meaningful chunk of a monthly budget, and you will only find out when sales asks why the pipeline went dry.
Troubleshooting the Facebook Lead Ads Testing Tool
Most failures fall into a short list of causes. Here is the consolidated table the forums never quite give you.
| Symptom | Likely cause | Fix |
|---|---|---|
| Tool page is empty, blank, or "does not work" | Intermittent Meta backend glitch | Refresh, try incognito or another browser, or wait and retry. This is usually temporary on Meta's side, not your setup. |
| Create Lead or Preview button missing or greyed out | Insufficient role or Lead Access | Confirm an Advertiser or Admin Page role, and that your user plus the CRM app are assigned under Business Settings, Integrations, Lead Access. |
| "No app associated with that page" | The Page has no CRM or app granted lead access | In Business Settings, Lead Access, assign the correct app to the Page and include your account, then refresh the tool. |
| Cannot create a new test lead | A previous test lead still exists | Click Delete Lead first. Only one active test lead per form is allowed. |
| Track Status shows Failed | Webhook endpoint error or revoked access | Check your endpoint returns HTTP 200, review its logs, and read the error_code. For error 103, reassign your CRM app under Lead Access. |
| Lead shows in the tool but not in your CRM or Zap | Integration or timing issue | Compare the Track Status payload to your CRM's expected fields, confirm the app is Live with lead permissions, and make sure your automation was listening when you clicked Create Lead. |
| Tool will not load for a development app | App is in development mode | Switch the app to Live with the required permissions, or use the Graph API. |
| Form content mistake found after launch | Form was published with an error and then received a lead | Forms lock after their first lead. Catch this in Form QA before launch; otherwise duplicate the form, fix it, and relaunch. |
Conclusion
The Facebook lead ads testing tool is a small utility with an outsized payoff. Free, fast, and impossible to mess up your reporting with, it lets you prove two separate things before a single dollar of spend: that the form reads and behaves correctly (Form QA), and that the lead actually reaches your CRM (Delivery QA). Keep the two layers distinct, remember the one-test-lead-per-form rule, and lean on Track Status as your source of truth for what Meta is really sending.
The advertisers who run lead gen profitably are not the ones with secret targeting. They are the ones who never launch a form they have not watched deliver a test lead end to end, and who run that same check on every form when they scale. Spend the few minutes per form now. It is far cheaper than discovering a broken handoff after the budget is gone.
