Creating Facebook lead ads means building a campaign on Meta's Leads objective that collects contact details inside an instant form or on your website. In Ads Manager you click Create, choose Leads, pick a conversion location and performance goal, select your Page, build the ad, and attach a lead form. Instant forms prefill name, email, and phone from a user's profile, while the conversion leads goal now requires Conversions API as of April 2026. Done right, it turns paid clicks into a trackable pipeline of qualified leads.
Lead ads are the lowest-friction way to capture a contact on Meta. Someone taps your ad, a form opens already filled with their name and email, they confirm, and you have a lead without ever sending them to a landing page. The problem is that Meta has quietly reworked the setup screens, so older instructions point you to an objective name and menu paths that no longer exist.
This is the current version. We will go from clicking Create to publishing a live campaign, using the names and screens you will actually see in 2026. The broader Facebook lead ads guide is the pillar this sits under, so if you want the strategy and the bigger picture, start there. Here we stay practical: the exact process to make a lead ad, plus the parts that actually matter in practice, like testing the form before you spend, engineering lead quality instead of just cheap volume, and creating these campaigns at scale.
After years running Meta campaigns across both lead gen and ecommerce, the pattern is always the same. The advertisers who win at lead ads are not the ones with a clever targeting trick. They are the ones who set the campaign up correctly, get the form right, and follow up fast. Let us build one.
What You Need Before You Start
A few things have to be in place before Ads Manager will let you publish a lead ad. Sort these first and the setup itself takes about ten minutes.
- A Facebook Page. Lead ads run from a Page, and the Page is where your leads are stored. If you do not have one, create it before anything else.
- An ad account with billing. You need an active ad account with a payment method, plus an admin or advertiser role on both the Page and the account. That role is what grants you lead access later.
- A privacy policy URL. Every instant form legally requires a link to a privacy policy. You can reuse the one on your website, so you do not need to write a new one, but you cannot publish without it.
- A Pixel, if you are sending traffic to your site. Website and conversion-location options need the Meta Pixel installed with a lead event. Pure instant-form campaigns do not.
- Conversions API, if you want the conversion leads goal. Optimizing for lead quality rather than raw volume requires CAPI sending lead status back from your CRM. More on why that is now mandatory below.
One targeting note worth knowing up front: you cannot run lead ads to anyone under 18. If your audience skews young, set your minimum age to 18 or Meta will reject the ad set.
How to Create Facebook Lead Ads in Ads Manager
This is the core walkthrough. Open Ads Manager, go to the Campaigns tab, and follow these six steps in order.
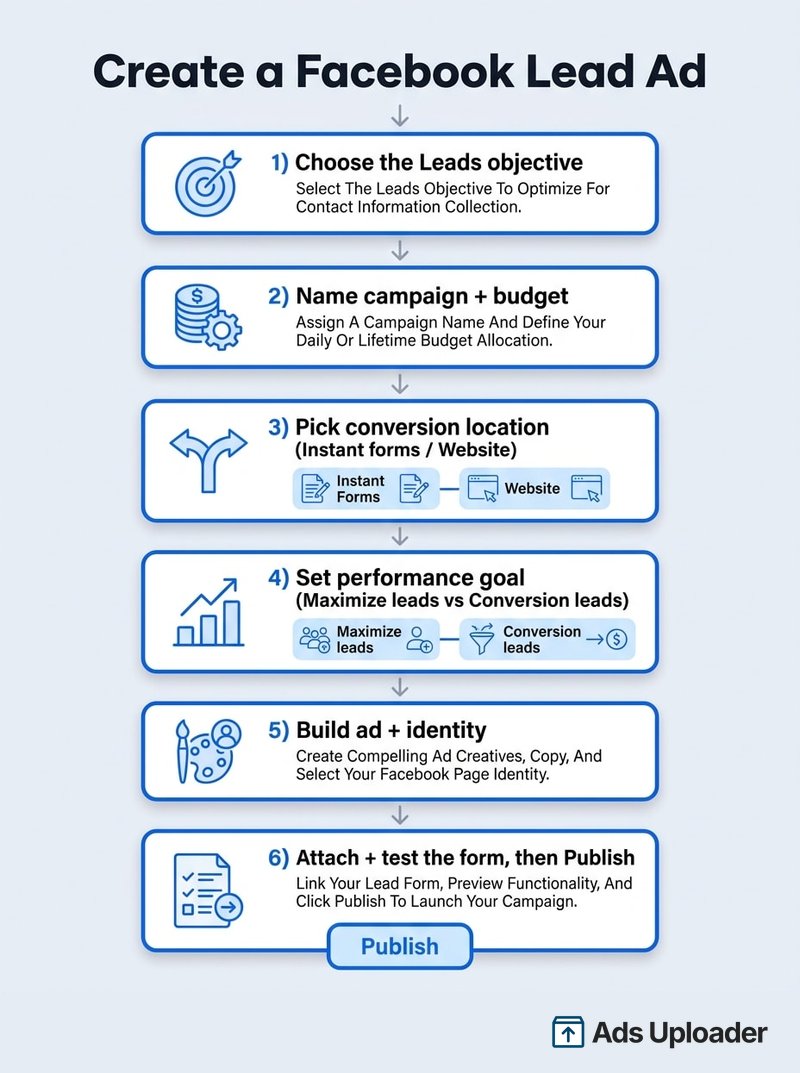
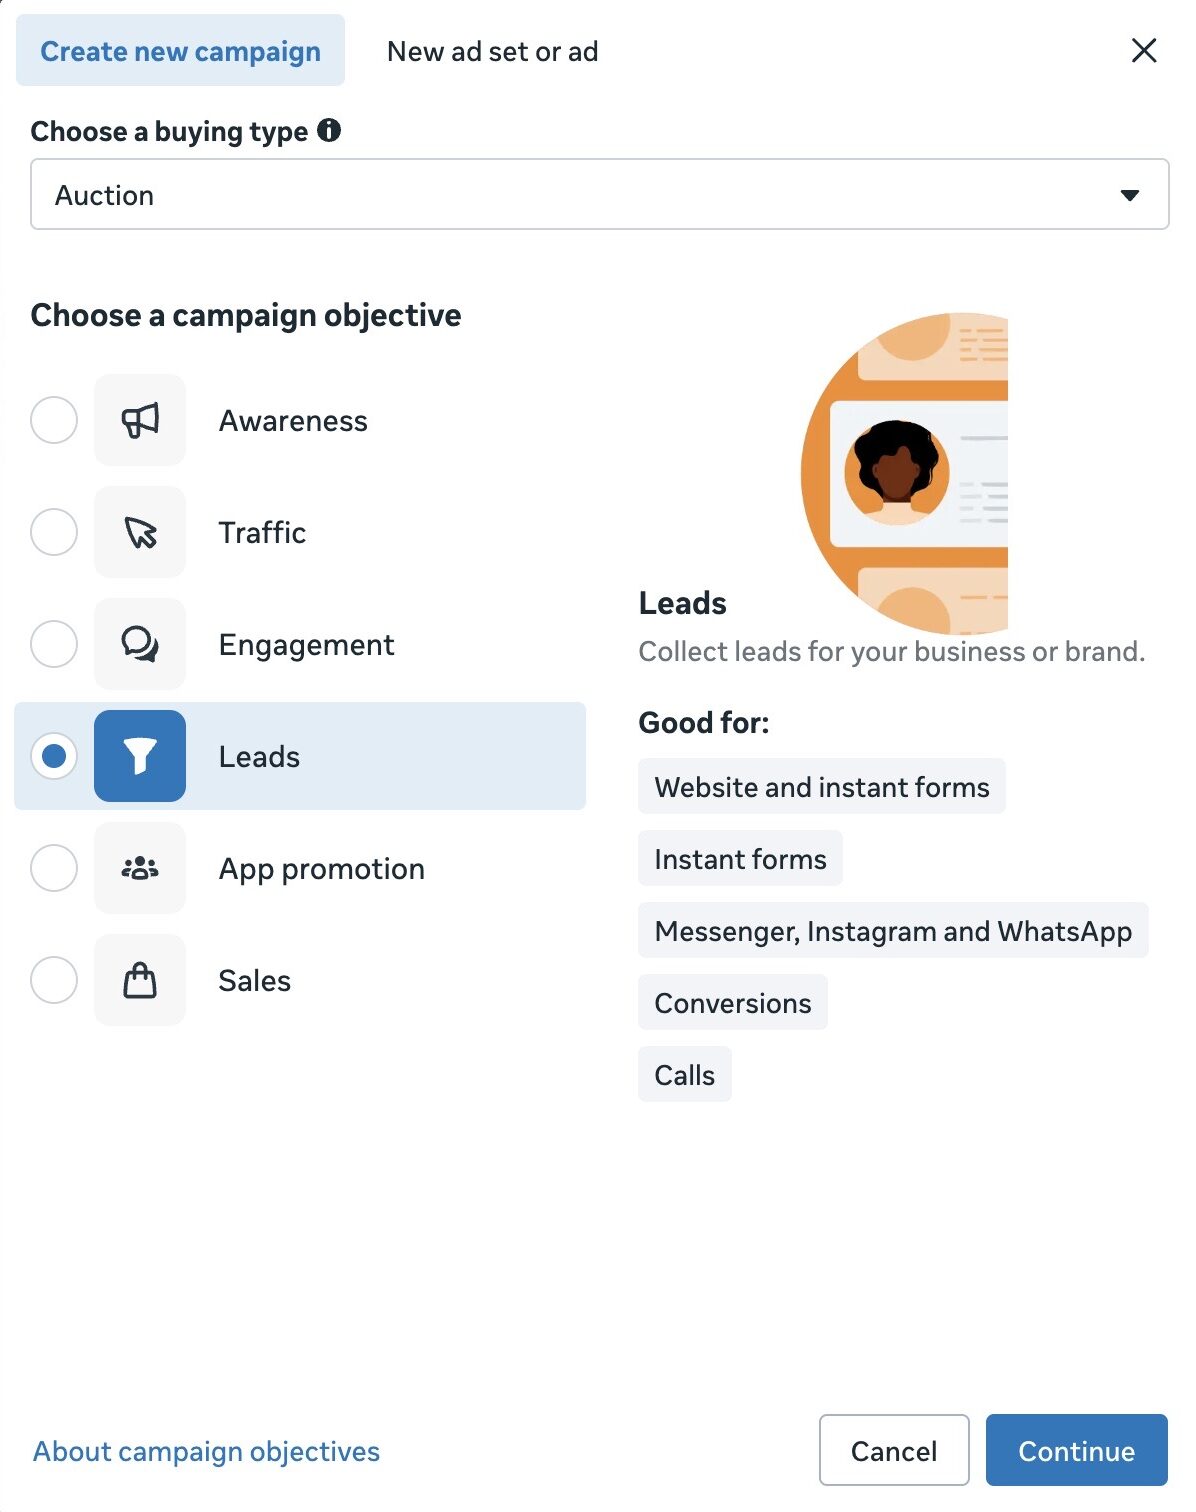
Step 1: Click Create and Choose the Leads Objective
Hit the green Create button. In the list of objectives, choose Leads. This is the single most common place people go wrong, because nearly every older tutorial calls it "Lead Generation." Meta retired that as a campaign objective when it moved to outcome-based objectives. The Leads objective now covers collecting contacts through instant forms, your website, calls, and messages, and the old "lead generation" wording survives only as an optimization label deeper in the flow. If you still see a campaign called Lead Generation, it is the same outcome under an older label, so the steps below still apply.
Step 2: Name the Campaign and Set Campaign-Level Options
Give the campaign a descriptive name you will recognize later, something like "June 2026 Lead Gen, Vancouver." At the campaign level you will also see the Advantage+ campaign budget toggle (the setting older guides call CBO). New accounts default to having it on, which lets Meta spread one budget across your ad sets automatically. You can switch it off if you want to set budgets per ad set instead. If your offer falls into credit, employment, housing, or social issues, set the Special Ad Category here too, since that restricts targeting by law. Click Next to move to the ad set.
Step 3: Pick Your Conversion Location
This is the most important decision in the whole setup, because it determines where the lead is actually captured. At the top of the ad set, Ads Manager asks where you want leads to go. The current options are combinations such as:
- Instant forms. The ad opens a native form inside Facebook or Instagram. Lowest friction, highest volume, no website needed.
- Instant forms and Messenger. Adds a Messenger conversation path alongside the form.
- Website. Sends people to a landing page. Requires the Meta Pixel with a lead event.
- Website and instant forms. Meta decides per person whether to send them to your site or open a form, optimizing for whichever converts.
- Website and calls, Calls, Instagram, WhatsApp, and App round out the list for businesses that capture leads by phone, chat, or in an app.
For most advertisers starting out, Instant forms is the right call. It keeps the entire transaction on-platform and produces the most leads for the least effort. Choose a website option only if you have a strong landing page and the Pixel firing correctly.
Launch More. Click Less.
Upload hundreds of creatives at once, auto-match thumbnails to videos, and export directly to Meta Ads Manager.
Try Ads Uploader FreeNo credit card required • 7-day free trial
Step 4: Choose Your Performance Goal
Once the conversion location is set, Ads Manager asks how to optimize delivery. You will see two goals:
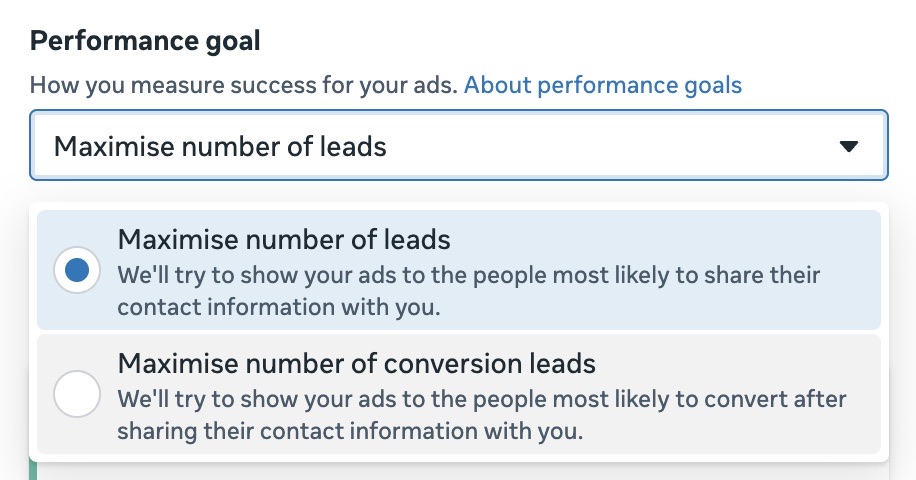
- Maximize number of leads. The default. Meta shows your ad to people most likely to submit the form. This optimizes for volume.
- Maximize number of conversion leads. Meta shows your ad to people most likely to become customers after they submit, based on lead status you feed back from your CRM. This optimizes for quality.
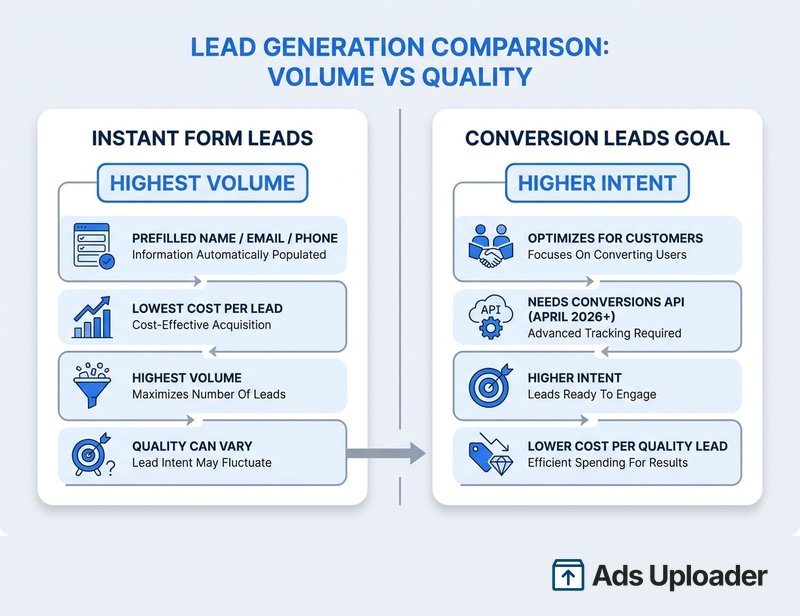
Here is a recent change that is easy to miss. Beginning April 2026, the conversion leads goal is no longer available for new campaigns without a Conversions API integration, and existing campaigns are affected from August 2026. In plain terms: if you have not connected CAPI so Meta can see which leads actually turned into customers, the conversion leads option will be greyed out, and you should pick Maximize number of leads. Meta's own testing has shown the conversion leads goal paired with CAPI can lower cost per quality lead by around 19% versus the standard goal, so it is worth setting up once you have the volume to justify it.
Finish the ad set by setting your budget and schedule, your audience (locations, age with that 18 minimum, interests, custom audiences), and your placements. Leave placements on Advantage+ unless you have a specific reason to restrict them. Click Next.
Step 5: Set Your Identity and Build the Ad Creative
At the ad level, first pick your identity: the Facebook Page, and optionally the Instagram account, that the ad runs from. The first time you create a lead ad you will also be asked to accept the Lead Ads Terms. You only do this once per Page.
Then build the creative. Choose your format (single image, video, or carousel), upload your media, and write the primary text, headline, and description. Pick a call-to-action button that matches the offer, such as Sign Up, Get Quote, or Apply Now. Strong lead ad creative is specific about the offer and gives a clear reason to hand over details, for example a free quote, a discount, or a useful resource. Vague creative pulls vague leads.
Step 6: Attach the Lead Form
Under the ad preview, click Create form (or select an existing one from your form library). This opens the instant form editor, where you set the form type, questions, privacy policy, and thank-you screen. This is the heart of lead quality, so it deserves its own treatment.
Building the Instant Form
The form is the conversion event, the exact moment someone decides to give you their details or bounce. Get the basics here and you can fine-tune later.
At a high level you choose a form type (more volume for the most submissions, higher intent to add a confirmation step that trims junk, or rich creative for a more branded layout), then assemble the questions. Instant forms prefill the contact fields they can read from a person's Meta profile, typically full name, email, and phone, and you add custom questions on top to qualify leads. You then add your privacy policy URL and disclaimer, and customize the completion screen people see after submitting, including an optional button to your site or a phone number.
One rule to burn into memory: once a form is published and attached to a live ad, you cannot edit it. To change anything, you duplicate the form, edit the copy, and swap the ad onto the new version.
Because the form does so much of the heavy lifting on lead quality, we cover the four sections, all three types, and the exact field-by-field setup in the dedicated guide on how the instant form works. Build the campaign here, design the form there.
Test Your Lead Form Before You Publish
Almost nobody does this, and it is the cheapest insurance in paid social. The in-editor Preview only shows you the layout. It does not prove that a real submission flows through to wherever you need it.
Run an actual test lead with Meta's Lead Ads Testing Tool. Select your Page and the form you just built, submit a test entry with dummy data, and confirm it arrives where it should: in your CSV download, in the Leads Center, and in your CRM if you have an integration or webhook connected. If it does not show up, you have a delivery problem to fix before, not after, you spend money. When you are done, delete the test lead so it does not pollute your real data.
For the full testing routine, including how to verify CRM and webhook delivery and clean up afterward, see our guide to the Lead Ads Testing Tool. Test once, publish with confidence.
Save Hours on Creative Testing
Stop uploading ads one by one. Bulk process unlimited creatives with automatic media matching and direct API publishing.
Try Ads Uploader FreeNo credit card required • 7-day free trial
Publish, Then Get Your Leads Out Fast
When the form passes its test, click Publish. The campaign goes into review and starts delivering once approved. Now the real work begins, which is getting leads out of Meta and into a follow-up process quickly.
You can collect leads in a few ways:
- Download a CSV from Ads Manager, your Page, or the Leads Center in Meta Business Suite.
- Use the Leads Center to triage. It shows new leads as Raw and lets you mark them In Progress, Interested, or Won so a small team can manage follow-up without a separate tool.
- Connect a CRM through a native integration, Zapier, or the Conversions API so leads sync in real time. Meta publishes a partner directory covering Salesforce, HubSpot, Mailchimp, and many others.
Two things matter here. First, Meta only keeps lead data for about 90 days, so manual CSV downloads are a liability at any real volume. Sync automatically. Second, speed wins: research from Harvard Business Review found that contacting a lead within an hour makes it roughly seven times more likely to qualify than waiting a day. The whole point of a frictionless form is undone if the lead sits unread overnight.
How to Get Higher-Quality Leads, Not Just Cheap Ones
Frictionless forms are a double-edged sword. The same two-tap submission that drives down cost per lead also invites accidental and low-intent signups. If your sales team is complaining about junk, tighten the form rather than the targeting.
- Add a qualifying question. One well-chosen question (budget, timeline, role) screens out tire-kickers and gives sales useful context.
- Switch to the higher intent form type. It adds a review step where the person confirms their details before submitting, which trims careless leads.
- Verify contact details. Turn on SMS one-time-passcode verification for phone numbers, or require a work email, when valid contact info is non-negotiable.
- Remember the prefill trade-off. Instant forms autofill from a profile, and that data can be stale, so a phone number might be three numbers old. Website forms make people type their details, which lowers volume but raises intent. Match the choice to how much quality matters for your offer.
- Use conversion leads optimization once CAPI is connected, so Meta learns from which leads actually close and steers delivery toward similar people.
Creating Lead Ads at Scale
Everything above describes building one campaign by hand. That is fine for a single business with one offer. It falls apart the moment you are launching across many locations, running fresh creative weekly, or managing lead gen for a roster of clients.
Ads Manager gives you the Duplicate function at the campaign, ad set, and ad level, which copies targeting, budget, and the attached form so you can clone a working setup and tweak the location or audience. Forms also live in your Page's form library, so you can reuse a proven form across many ads instead of rebuilding it each time. For true automation, the Meta Marketing API lets developers create and duplicate campaigns programmatically.
The catch is that native Ads Manager has no spreadsheet import for building dozens of lead campaigns at once, and the API is a developer project, not a marketer's tool. If your week is dominated by repetitive lead ad setup across locations or clients, that repetition is exactly what should be automated.
Common Mistakes and How to Fix Them
A handful of issues account for most failed lead ad launches. Here is how to spot and fix each.
- No leads after launch. Check that the ad is actually delivering, the form is attached, and the audience is large enough to exit learning. If your conversion location expects a call or message, make sure the creative tells people that is the action.
- Conversion leads option greyed out. That means CAPI is not connected to the ad account. Either set up the integration or select Maximize number of leads instead.
- Cannot edit your form. Published forms are locked. Duplicate it, edit the copy, publish, and switch the ad to the new version.
- Junk leads flooding in. Add a qualifying question, switch to higher intent, and turn on phone or work-email verification.
- Leads disappearing. Meta deletes lead data after about 90 days. Set up an automatic sync so nothing is ever lost to the clock.
Bringing It Together
Creating Facebook lead ads in 2026 is a clear path once you know the current screens: choose the Leads objective, pick your conversion location, set the right performance goal, build and test the form, then publish and pull leads into follow-up fast. The advertisers who get the most out of lead ads are not chasing a secret setting. They set the campaign up correctly, engineer the form for quality, and respond to every lead while it is still warm.
Keep one date in mind as you build: from April 2026, the conversion leads goal needs a Conversions API connection, so plan that integration if lead quality is your priority. Start with a single clean campaign, get the form and the follow-up working, and prove the funnel. Then, when you are ready to do this across many offers, locations, or clients, automate the repetitive setup so you can spend your time on the strategy that actually moves cost per lead.
