Adding the Meta Pixel to WordPress means installing Meta's tracking code so your site reports visitor actions back to Ads Manager. You first create the pixel in Meta Events Manager to get the base code or Pixel ID, then add it through one of several routes: a tracking plugin like PixelYourSite, the official Meta Pixel for WordPress plugin, a code-snippet plugin such as WPCode, Facebook for WooCommerce for stores, or pasting the code into your theme header manually. You then verify it fires. The pixel itself is free.
Adding the Meta Pixel to WordPress looks like a two-minute job until a caching plugin minifies it away, a theme update wipes your header edit, or you end up running two pixels and double-counting every conversion. WordPress gives you more install routes than any other platform, and several WordPress-specific ways for a pixel to quietly break after it is live, so getting it firing is only half the job.
This guide covers the methods that matter for the meta pixel for WordPress: the plugin routes, the manual header method done safely, WooCommerce events, and the WordPress-specific troubleshooting for when a pixel that installed fine quietly stops firing. If you want the concept first, the pillar covers what the Meta Pixel is and how it works. Here, we install it and make sure it actually fires.
The Five Ways to Add a Meta Pixel to WordPress
There is no single right method, only the right one for your setup. If you want the short answer: install PixelYourSite unless you run a WooCommerce store, in which case use Facebook for WooCommerce. Here are all five routes and who each suits.
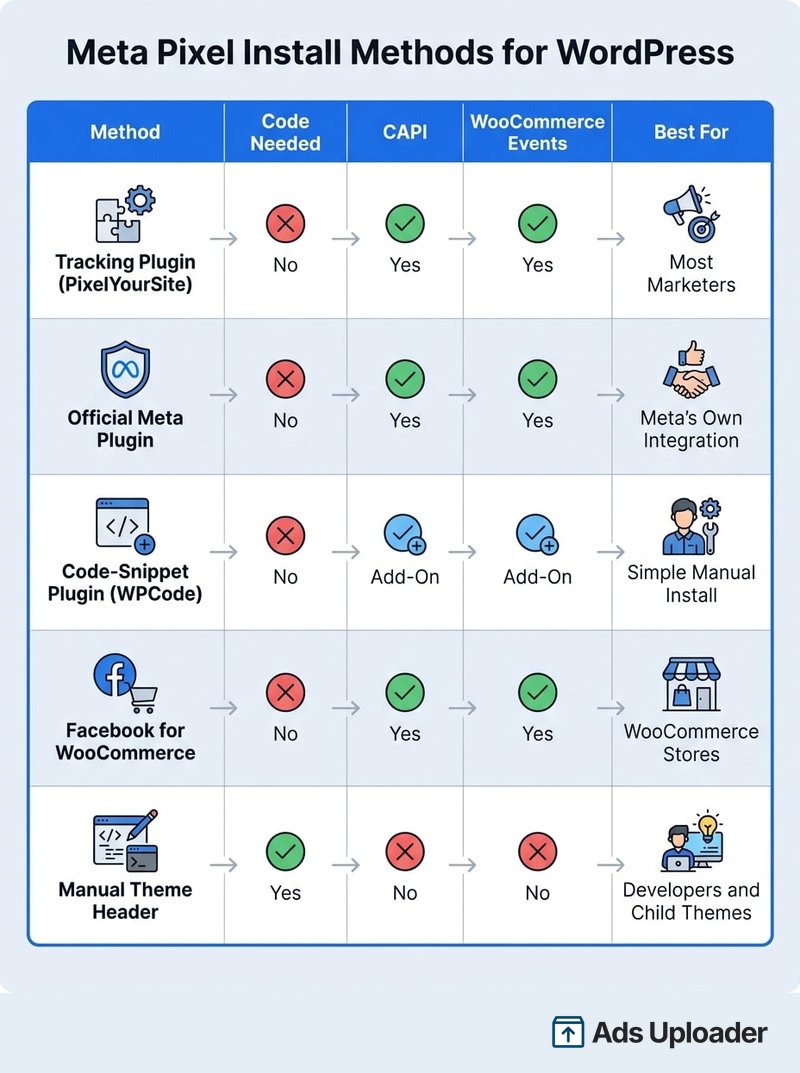
- Tracking plugin (PixelYourSite, Pixel Cat). No code, fires events automatically, supports the Conversions API. Best for most marketers.
- Official Meta Pixel for WordPress plugin. Free, official, supports CAPI and WooCommerce events, but has a mixed track record. Best when you specifically want Meta's own plugin.
- Code-snippet plugin (WPCode, formerly Insert Headers and Footers). Drops the base code in the header without touching theme files. Best for simple sites and non-developers.
- Facebook for WooCommerce. Auto-configures CAPI, advanced matching, and commerce events. Best for stores.
- Manual theme header code. Paste into the head via a child theme. The legacy route, and the riskiest, because theme updates can erase it.
If you have not created a pixel yet, the platform-agnostic walkthrough in how to set up the Meta Pixel covers the create-and-install flow end to end. This page focuses on the WordPress side. On a hosted store platform the path is different again, which is why adding the Meta Pixel to Shopify is its own guide.
Before You Start: Create Your Pixel and Get the Base Code
Every method needs either the base code or, for most plugins, just the Pixel ID. You get both from Meta Events Manager.
The short version: open Events Manager, click Connect data, choose Web, then create and name a dataset (Meta's current word for a pixel - same thing). That generates your Pixel ID and the base code snippet; the setup guide linked above has the click-by-click detail. Older tutorials that send you to a "Pixels" tab or claim you get "one pixel per ad account" are out of date; pixels are managed per business portfolio now, and you are not limited to one.
Copy the base code if you plan to install manually. If you are using a plugin, you usually only need the Pixel ID. You will also need admin access to your WordPress site and about ten minutes.
Method 1: Add the Meta Pixel With a Plugin (Recommended)
Plugins are the right default for most sites. They avoid core-file editing, survive theme updates, fire events automatically, and make the Conversions API and WooCommerce events far easier to set up.
Option A: PixelYourSite or a Tracking Plugin
PixelYourSite is the most popular dedicated option, with more than 500,000 active installs. The free version is described as a complete tracking solution for the Meta Pixel with full Conversions API support, and setup is genuinely simple: as the plugin's own docs put it, you enter your Pixel ID in the dedicated field and the plugin does the rest.
- Go to Plugins, Add New, search "PixelYourSite", then install and activate.
- Open the plugin settings and paste your Pixel ID.
- Confirm PageView is enabled, then set up standard events with the point-and-click options.
- Optionally connect the Conversions API for server-side tracking.
It also handles consent and GDPR integration and works across other platforms (Google, Pinterest, TikTok), which is useful if you run more than Meta. You can read the full feature list on the PixelYourSite plugin page.
Option B: The Official Meta Pixel for WordPress Plugin
This is the plugin Meta offers inside the Events Manager flow when it detects WordPress. Install Meta pixel for WordPress (authored by Facebook), click Get Started, complete the Facebook Business Extension login, and agree to share your access token. It fires PageView by default and supports the Conversions API plus WooCommerce events (Lead, ViewContent, AddToCart, InitiateCheckout, and Purchase). Version 5.1.0 (May 2026) added Facebook Login for Business and WooCommerce HPOS compatibility.
Be candid about it: on WordPress.org it carries a mixed, roughly two-to-three-star reputation, with a recurring "Connection Pending" status and other setup complaints. It is free, official, and well integrated, so it is a reasonable pick if you want Meta's own tooling. But if it fights you, a tracking plugin is usually a smoother experience. You can check the current rating and changelog on the official plugin page.
Option C: A Code-Snippet Plugin (WPCode)
If you just want the base code in the header without editing theme files, use WPCode (formerly Insert Headers and Footers).
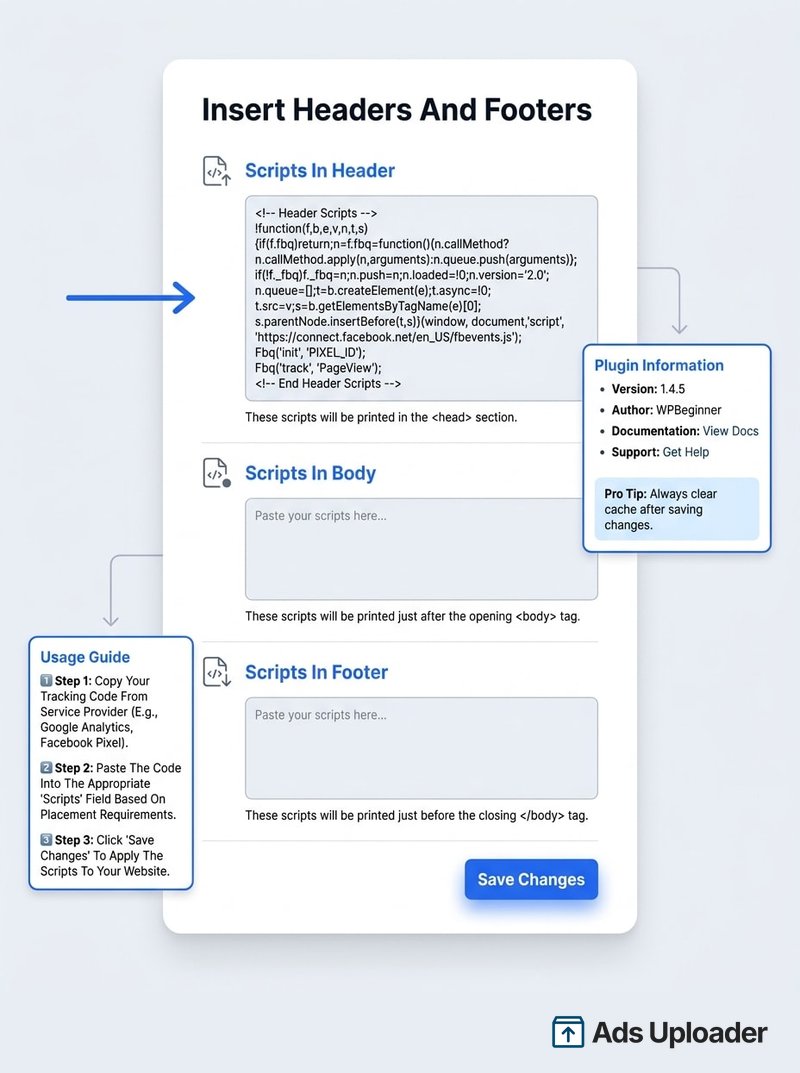
- Install and activate WPCode.
- Go to Code Snippets, Header & Footer (or Settings, Insert Headers and Footers in the free version).
- Paste the full base code into the Header box and save.
This fires PageView site-wide. For AddToCart and Purchase you still need WooCommerce events, covered below, or WPCode's premium Conversion Pixels add-on, which can auto-map them.
Launch More. Click Less.
Upload hundreds of creatives at once, auto-match thumbnails to videos, and publish straight to your ad accounts through Meta's API.
Try Ads Uploader FreeNo credit card required • 7-day free trial
Method 2: Add the Meta Pixel Manually (Without a Plugin)
The manual route suits people who want to avoid an extra plugin, run a custom or child theme, or have a developer who owns the theme. Copy the base code from Events Manager and place it between the opening and closing <head> tags so it loads on every page, before the visitor leaves.
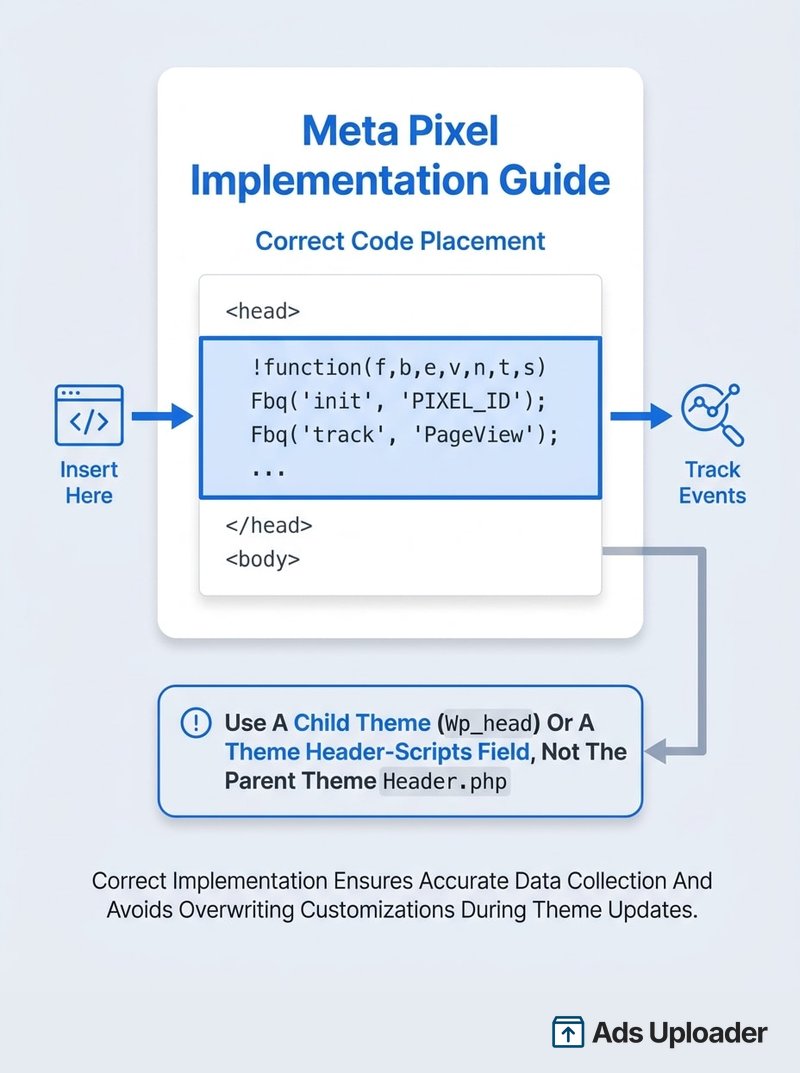
Do it the safe way. Do not paste into the live parent theme's header.php through Appearance, Theme File Editor: a theme update will overwrite the file and your pixel will vanish, usually without anyone noticing. Instead, use one of these:
- A child theme that hooks the snippet into
wp_headviafunctions.php. - A theme or page-builder header-scripts field. Elementor, Divi, Astra, and Kadence all expose one.
One rule for either approach: do not also run a plugin pixel with the same ID, or every event fires twice. Pick a single method and stick with it.
Track WooCommerce Events (AddToCart, Purchase, Value)
PageView alone is not enough for a store. Meta's delivery system optimizes against what it can see, so it needs AddToCart, InitiateCheckout, and Purchase with a value and currency to learn who buys.
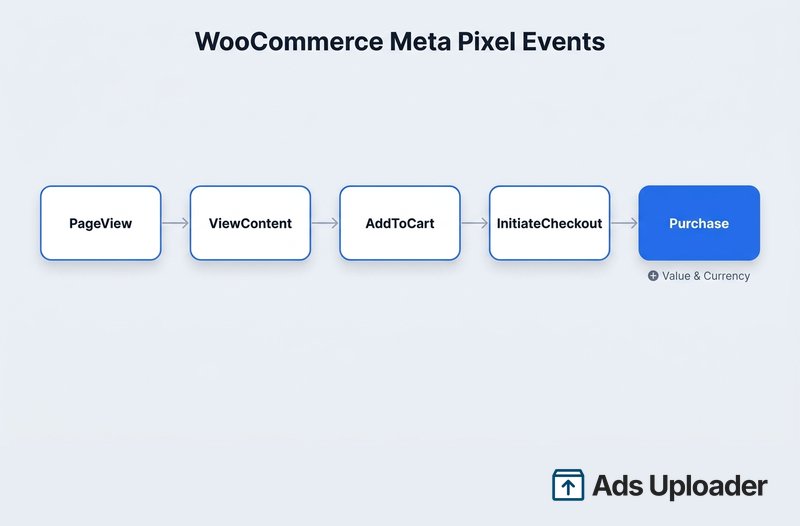
The easiest path is the official Facebook for WooCommerce plugin, installed separately from the base pixel plugin. Connect your account and it automatically configures the Conversions API and advanced matching, fires the standard commerce events out of the box, and can sync a product catalog for catalog ads.
If you already installed PixelYourSite in Method 1, use its WooCommerce integration instead of adding a second plugin: it fires all the key commerce events automatically too. Starting fresh on a store with no pixel plugin yet? Go straight to Facebook for WooCommerce. The thing to avoid is running both at once: the same event will fire client-side from one and server-side from the other, double-counting Purchases. Meta resolves pixel and CAPI overlap by matching an event_id across the two, so either rely on that deduplication or disable one pixel.
Verify Your Meta Pixel Is Working on WordPress
This is the step most installs skip and most failures hide in. Two tools, used together, catch almost everything.
Use the Meta Pixel Helper Extension
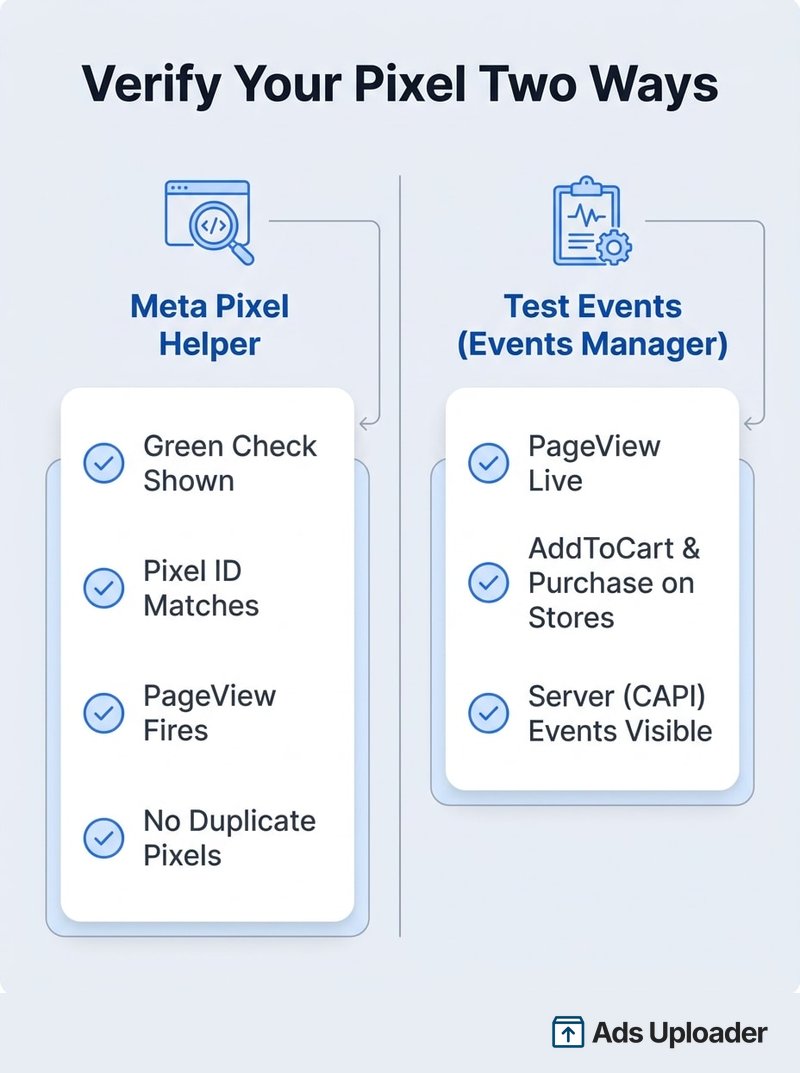
Install the Meta Pixel Helper Chrome extension, open your WordPress site, and click its icon. A green check with your Pixel ID and a PageView event means the browser-side pixel is live. Confirm the ID it shows matches the one in Events Manager. The extension also flags duplicate pixels and parameter errors, which is exactly the kind of thing that goes wrong on WordPress. For reading every state and error it surfaces, see the full Meta Pixel Helper guide.
Use Test Events in Events Manager
Pixel Helper only sees browser events. To confirm server-side Conversions API events, open Events Manager, select your dataset, open Test Events, enter your site URL, and load it. You will see PageView register live, plus AddToCart and Purchase on a store, including the server events the extension cannot show.
Confirm There Are No Duplicate Pixels
If Pixel Helper shows the same ID twice, you almost certainly have two install methods active, commonly a plugin pixel plus a leftover manual snippet. Remove one.
Save Hours on Creative Testing
Stop uploading ads one by one. Bulk process unlimited creatives with automatic media matching and direct API publishing.
Try Ads Uploader FreeNo credit card required • 7-day free trial
Why Your Meta Pixel Is Not Firing on WordPress
Most WordPress pixels do not break at install. They break afterward, in ways unique to the platform. These are the failure modes to check, each one specific to how WordPress builds and serves your pages.
A Caching or Optimization Plugin Is Stripping It
WP Rocket, LiteSpeed Cache, Autoptimize, and W3 Total Cache can minify, combine, defer, or delay JavaScript, and any of those can stop the pixel loading. Exclude Meta's scripts (fbevents.js and the fbq inline code) from JS minification, deferral, and delay, or use a plugin that injects the pixel server-side. Each caching plugin keeps its exclusion list in a different place (in WP Rocket it is under Settings, then File Optimization, in the JavaScript section), so search your plugin's docs for "exclude JavaScript" if you do not see it.
A Theme Update Wiped Your Header Edit
A pixel pasted into a parent theme's header.php disappears the next time that theme updates. Move it to a child theme or a plugin so it persists.
Duplicate or Double-Counted Events
Two methods at once (plugin plus manual, or two plugins) fire everything twice. Remove one. For an intentional pixel-plus-CAPI setup, lean on event_id deduplication instead of disabling either.
A Consent or Cookie Plugin Is Blocking It
Consent plugins such as Complianz, CookieYes, and Cookiebot can hold the pixel until a visitor opts in. Make sure the pixel sits in the consent category that fires only after opt-in: it is called "Marketing" in Complianz and Cookiebot, and lives under the non-necessary/advertisement groups in CookieYes. For EU and UK traffic this gating is required, not optional, and you should disclose the pixel in your privacy policy.
The ID Is Wrong or the Code Is in the Body
A wrong Pixel ID sends events to the wrong dataset, and a snippet pasted in the footer or body fires late. Verify the ID against Events Manager and keep the code in the head.
Conclusion
For most WordPress sites, a tracking plugin like PixelYourSite is the cleanest way to add the meta pixel for WordPress. WooCommerce stores are usually best served by Facebook for WooCommerce, a simple site by a code-snippet plugin, and a manual install only when it goes through a child theme rather than a raw theme-file edit. Whichever route you pick, install one method, not two.
Then verify before you trust it. A green check in Pixel Helper plus live events in Test Events is the difference between tracking you assume works and tracking that does. And keep the WordPress-specific traps in mind afterward: caching plugins, theme updates, duplicates, and consent gating are what quietly take a working pixel offline. As browser tracking keeps degrading, pairing the pixel with the Conversions API is the durable next step.