Adding the Meta Pixel to Shopify means connecting Meta's tracking code to your store so it records actions like page views, add to cart, and purchases. Shopify offers three paths: the Facebook and Instagram sales channel app (no code, recommended), a custom pixel through Customer Events (paste JavaScript, full control), or legacy manual theme code (discouraged because it misses checkout events). You choose a data-sharing level, then verify with the Test Events tool. The pixel is free and powers retargeting, conversion tracking, and Advantage+ campaigns.
You connected a pixel, Events Manager says it is active, and your ads are spending. Then you compare Meta's reported Purchases against your actual Shopify orders, and the numbers do not line up. This is the most common Shopify tracking problem, and it usually traces back to one thing: Shopify hosts its own checkout with its own pixel rules, so generic install advice quietly breaks on the page that matters most.
This guide is the Shopify-specific version of the job. If you want the background on what the pixel is and how it works, start with the Meta Pixel overview. Here, the focus is narrow and practical: pick the right install method for a Shopify store, set it up cleanly, and confirm it actually fires all the way through checkout.
The Three Ways to Add a Meta Pixel to Shopify
There are three ways to get a Meta Pixel onto a Shopify store, and they are not equal. It is common to see only one of them, which is how merchants end up with partial tracking. Here is how they compare.
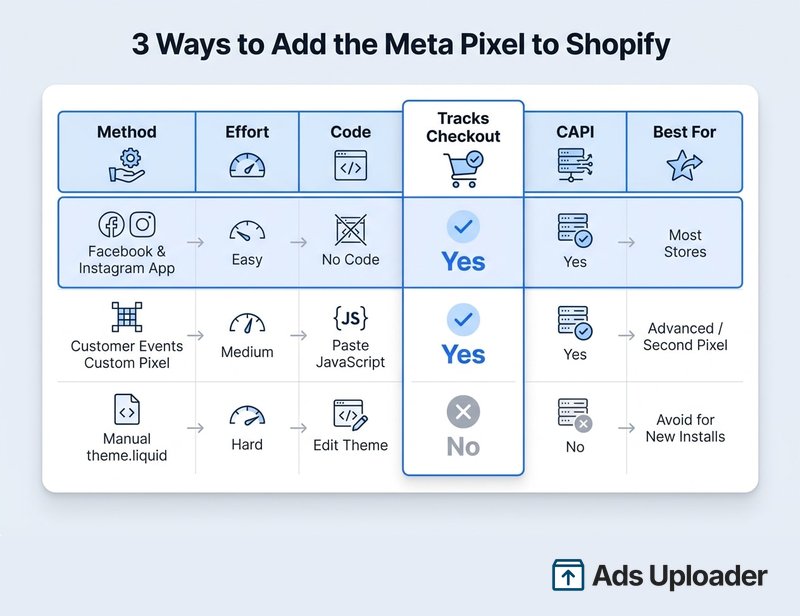
- Facebook and Instagram sales channel app. The official, no-code path. It connects one pixel, fires on checkout, and sends events server-side through the Conversions API when data sharing is set to Enhanced or Maximum. Best for the large majority of stores.
- Customer Events custom pixel. You paste a JavaScript snippet into Shopify's Customer Events and subscribe to the events you want. More control, runs correctly on checkout, and useful when you need a second pixel or precise event handling.
- Manual theme.liquid edit. The old way: paste pixel code into your theme. It does not fire on Shopify's hosted checkout, it conflicts with the app, and Shopify is retiring the scripts it depends on. Avoid it for new installs.
If you have not created a pixel yet, the platform-agnostic walkthrough in how to set up the Meta Pixel covers creating one in Events Manager. This article assumes you either have a pixel or will let the Shopify app create one for you.
Before You Start: Shopify Pixel Prerequisites
Both official methods share the same groundwork. Have these ready before you begin:
- A Shopify store that is not password protected, so events can fire and products can sync.
- A Facebook Page for your business that complies with Meta's terms.
- A Meta business portfolio that owns that Page, with admin permissions for you.
- A store located in a supported country with a verified domain.
The Facebook and Instagram channel is free to use across Shopify plans, subject to store eligibility, so you do not need a specific tier just to install the pixel. You will also decide one thing up front: let the app create a fresh pixel, or connect a pixel you already have in Events Manager.
Create a Meta Pixel First (If You Do Not Have One)
If you are starting from scratch, you can create the pixel inside the Shopify flow when prompted, or create it first in Events Manager by going to Connect Data, choosing Web, and naming your pixel. Remember the Shopify constraint: the sales channel connects one pixel per store, so pick the pixel you actually want to optimize against.
Method 1: Connect the Facebook and Instagram Sales Channel (Recommended)
This is the path Shopify and Meta both point you toward. It requires no code, handles checkout tracking, and turns on the Conversions API for you.
- Install the Facebook and Instagram app from the Shopify App Store.
- In your Shopify admin's left sidebar, find the Sales channels section (click the + or Add control if Facebook and Instagram is not listed yet), select Facebook and Instagram, and click Add sales channel.
- Click Start setup, then Login with Facebook, and sign in to the account tied to your business portfolio.
- Follow the prompts to select your Facebook Page and business portfolio, then connect an existing pixel or create a new one.
- Set your data-sharing level (covered below) and accept the terms.
- Click Submit and wait for the connection to finish.
Do not skip this step: after it connects, open one of your products and confirm the Facebook and Instagram sales channel is toggled on under publishing. Products that are not published to the channel will not appear in catalog or Advantage+ catalog ads. This is the single most common way a Shopify setup looks "connected" while the ads have nothing to show.
Choose Your Data-Sharing Level: Standard, Enhanced, or Maximum
When you enable data sharing, Shopify asks you to pick a level. The choice controls how much customer information flows to Meta.
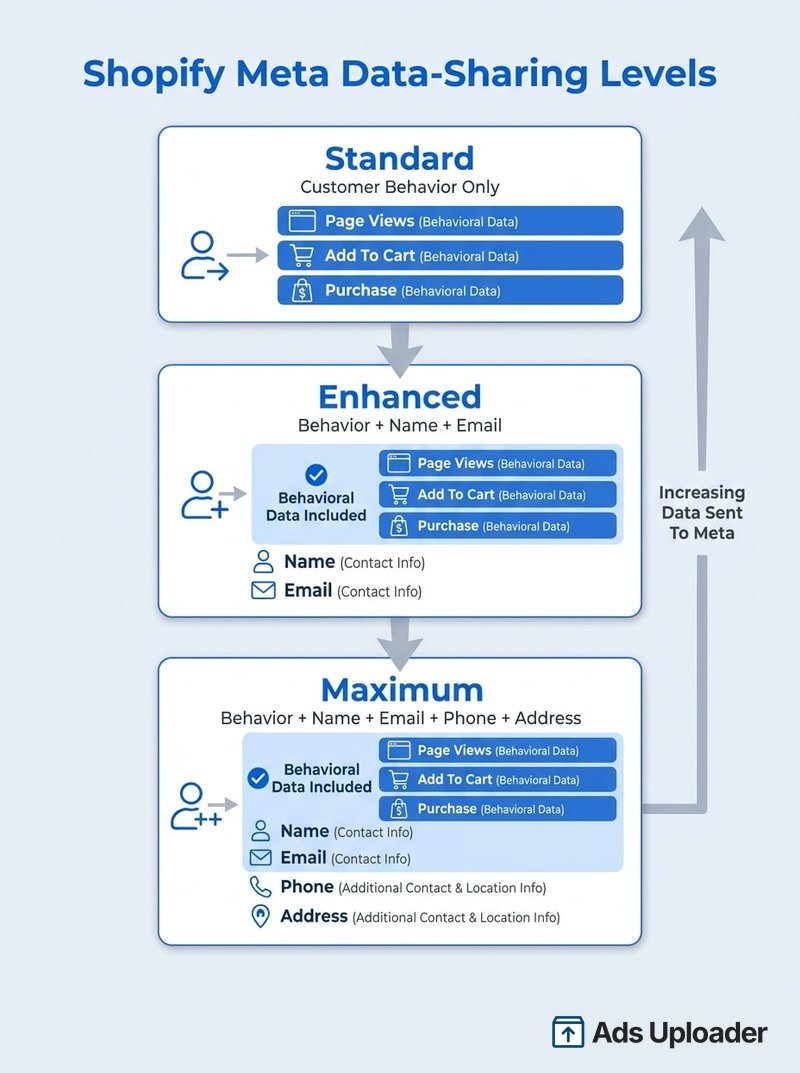
- Standard sends only customer behavior, such as page views and purchases.
- Enhanced adds personal identifiers like name and email address.
- Maximum adds more, including phone number and address.
More identifiers mean better event matching and stronger custom and lookalike audiences. The catch is consent. Whatever level you choose has to be reflected in your privacy policy and your cookie consent banner, especially in the EEA and UK where Shopify's Customer Privacy settings gate tracking until a visitor opts in. For most stores, Enhanced or Maximum with a compliant banner is the right balance.
Confirm Conversions API and Always-on Data Access
With data sharing on Enhanced or Maximum, the channel sends events server-side through the Conversions API alongside the browser pixel, which is what keeps tracking alive when ad blockers or browser privacy settings block the client-side pixel. On Standard, you are getting browser-only tracking, which defeats half the point of using the app. In your data access settings, keep the option set to Always on rather than limiting it, so the integration sends events continuously. Running the pixel and Conversions API together is the current standard, and Meta deduplicates the two streams using a shared event ID so the same order is not counted twice.
Method 2: Add a Custom Pixel Via Shopify Customer Events
Use this method when you want explicit control over which events fire, when you are running a second pixel, or when you need to manage deduplication precisely. It runs in Shopify's web pixel sandbox, so unlike manual theme code, it does fire on the checkout and thank-you pages.
- In your Shopify admin, go to Settings, then Customer events.
- Click Add custom pixel and give it a name.
- Paste Meta's base pixel code, but remove the opening and closing
<script>tags. The sandbox only accepts JavaScript, and leaving the tags in is the single most common reason the pixel will not save. - Keep the initialization line, for example
fbq('init', YOUR_PIXEL_ID), and replaceYOUR_PIXEL_IDwith your real numeric ID from Events Manager - pasted as-is, nothing fires. Theanalytics.subscribecalls below use Shopify's current Customer Events API syntax.
Subscribe to Standard Events
After initializing, you subscribe to Shopify's customer events and map each one to a Meta event. A trimmed example:
fbq('init', YOUR_PIXEL_ID);

analytics.subscribe("page_viewed", (event) => {
  fbq('track', 'PageView');
});

analytics.subscribe("product_viewed", (event) => {
  fbq('track', 'ViewContent', {
    content_ids: [event.data?.productVariant?.id],
    value: event.data?.productVariant?.price?.amount,
    currency: event.data?.productVariant?.price?.currencyCode,
  });
});

analytics.subscribe("product_added_to_cart", (event) => {
  fbq('track', 'AddToCart');
});

analytics.subscribe("checkout_started", (event) => {
  fbq('track', 'InitiateCheckout');
});

analytics.subscribe("checkout_completed", (event) => {
  fbq('track', 'Purchase', {
    value: event.data?.checkout?.totalPrice?.amount,
    currency: event.data?.checkout?.currencyCode,
  });
});
Shopify's full event reference covers the rest, including Search and AddPaymentInfo. You can see Meta's complete sample in Shopify's create custom pixel code documentation.
Launch More. Click Less.
Upload hundreds of creatives at once, auto-match thumbnails to videos, and publish straight to your ad accounts through Meta's API.
Try Ads Uploader FreeNo credit card required • 7-day free trial
Set Consent Permissions
Custom pixels respect Shopify's Customer Privacy settings. By default, a new custom pixel requires Marketing and Analytics permissions, and in regions configured for consent it will not run until the visitor grants them. Review the Customer privacy section of your pixel's settings, and confirm the data-sale setting matches how you want the pixel to behave for shoppers who opt out.
Method 3: Manual theme.liquid Install (And Why to Avoid It)
The legacy approach is to open Online Store, then Themes, then Edit code, and paste the pixel into theme.liquid between the <head> tags. It still works for basic page views, but on Shopify it is the wrong tool in 2026 for three reasons.
First, it does not fire on Shopify's hosted checkout. Your storefront theme does not render the checkout, so InitiateCheckout and Purchase events never trigger, and your reported conversions undercount real sales. Second, if you also connect the app, you end up with two pixels firing and duplicate or conflicting data. Third, Shopify is retiring the mechanisms manual scripts rely on. Under checkout extensibility, checkout.liquid and the Additional Scripts box are being phased out in favor of web pixels and Customer Events, so the manual route is a dead end.
If you previously added pixel code to your theme, remove it before connecting through the app. Delete the snippet from theme.liquid (or clear it under Online Store, then Preferences), and in the Facebook and Instagram channel under Settings and Share data settings, click Change to clear the old pixel ID. Shopify's own Meta pixel help page walks through the same removal steps. On platforms with a more open template system, manual installs are more common; if that is your situation, see the platform-specific guide for adding the Meta Pixel to WordPress.
Verify Your Shopify Meta Pixel Is Working
Installing the pixel is only half the job. You need proof that events fire, especially through checkout.
Start with the Meta Pixel Helper browser extension. Open your storefront with the extension running and walk the buying journey: load the homepage and look for PageView, open a product for ViewContent, add to cart for AddToCart, and begin checkout for InitiateCheckout. Click the icon and confirm the pixel ID matches the one in Events Manager. For a deeper walkthrough of reading its warnings and errors, see the Meta Pixel Helper guide.
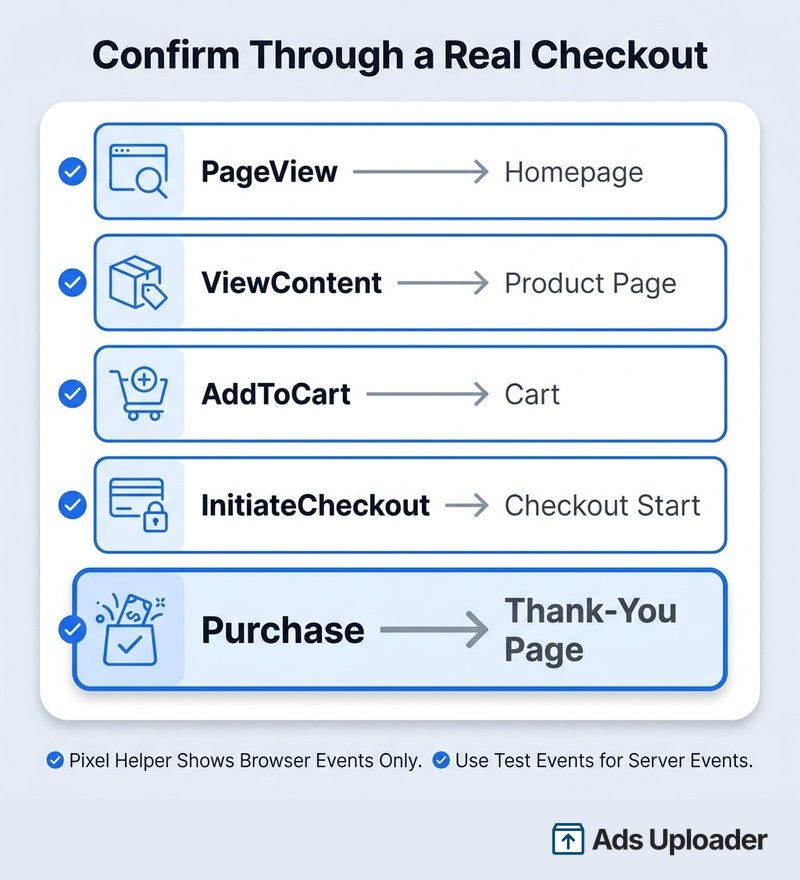
Then open the Test Events tab in Events Manager. This is the step the Pixel Helper cannot replace, because the extension only sees client-side events. Anything sent server-side through the Conversions API is invisible to the browser tool but visible in Test Events. Run a genuine test purchase through checkout and confirm the Purchase event arrives with the correct value and currency.
Troubleshooting Common Shopify Meta Pixel Problems
Most Shopify pixel issues fall into a handful of patterns. Here is how to diagnose them.
Pixel Fires but Does Not Appear When Building a Campaign
You see events in Test Events or the Pixel Helper, but when you create a campaign the pixel is not in the dropdown. This is an asset-assignment problem, not an install problem. The pixel and your ad account must live in, or be shared with, the same Meta business portfolio. In Events Manager, confirm the ad account is added as an asset on the pixel, re-add it if needed, and make sure Shopify's Share data settings are enabled. Merchants who hit this almost always resolve it by fixing the assignment, not by reinstalling.
Duplicate or Double-Counted Events
If purchase counts look inflated, you likely have two pixels firing, usually the app plus a leftover theme snippet. Open the Pixel Helper and check whether more than one pixel ID is active on the page. Remove the legacy code, and where the pixel and Conversions API both report, confirm they share a matching event ID so Meta can deduplicate them.
Pixel Helper Shows Nothing but the Integration Is Active
When the Shopify integration is Active but the Pixel Helper is empty, your events are most likely flowing server-side through the Conversions API only. That is not a failure. Verify in Test Events instead, where both browser and server events appear.
The Custom Pixel Will Not Save
Red errors when saving a Customer Events custom pixel almost always mean <script> tags are still in the code. Strip the opening and closing tags and keep only the JavaScript body.
Events Are Missing Through Checkout
If everything fires until checkout and then goes quiet, you are relying on manual theme code that does not run on Shopify's hosted checkout. Switch to the sales channel app or a Customer Events custom pixel, both of which capture checkout and Purchase events.
Save Hours on Creative Testing
Stop uploading ads one by one. Bulk process unlimited creatives with automatic media matching and direct API publishing.
Try Ads Uploader FreeNo credit card required • 7-day free trial
Frequently Asked Questions
Is the Facebook Pixel the Same as the Meta Pixel on Shopify?
Yes. Meta rebranded the Facebook Pixel as the Meta Pixel in 2022, but it is the same JavaScript tracking tool with the same pixel ID and the same fbq code. Shopify help articles and apps use both names interchangeably.
Can I Add Multiple Meta Pixels to One Shopify Store?
The Facebook and Instagram channel connects one pixel per store, and Shopify warns that multiple pixels cause duplicate or incorrect data. If you truly need a second pixel, add it through a separate Customer Events custom pixel and plan for deduplication. For most stores, one pixel is correct.
Do I Need to Edit Code to Add a Meta Pixel to Shopify?
No. The sales channel app and the Customer Events custom pixel both work without theme edits. Manual theme editing is the legacy approach and is discouraged, and any old theme pixel should be removed before connecting the app.
Does the Meta Pixel Track Shopify Checkout and Purchase Events?
Only through the sales channel app or a Customer Events custom pixel, both of which fire on the hosted checkout. A pixel pasted into theme.liquid does not run on checkout, so it misses Purchase events.
How Do I Remove an Old Meta Pixel From My Shopify Theme?
Edit theme.liquid under Online Store and Themes, delete the pixel block, or clear it under Preferences. Then click Change under the channel's Share data settings to clear the old pixel ID.
Should I Use Standard, Enhanced, or Maximum Data Sharing?
Standard sends behavior only, Enhanced adds name and email, and Maximum adds phone and address. More data improves matching, but it must be covered by your privacy policy and consent banner. Enhanced or Maximum with compliant consent suits most stores.
How Do I Confirm My Shopify Meta Pixel Is Firing Correctly?
Use the Pixel Helper for browser events and the Test Events tab for browser plus server events. Run a real test purchase and confirm PageView through Purchase all fire with the pixel ID matching Events Manager.
Get Tracking Right Before You Scale
For most Shopify stores, the decision is simple: connect the Facebook and Instagram sales channel, set a data-sharing level your consent banner supports, and let it enable the Conversions API. Reach for a Customer Events custom pixel when you need event-level control or a second pixel, and treat manual theme code as something to remove, not add.
Whichever path you choose, the work is not done until you have watched a real test purchase fire a Purchase event in Test Events. As checkout extensibility tightens through 2026, the sales channel app and Customer Events are the two durable methods, and both share one virtue the manual route never had: they track the checkout, which is the only event that pays the bills. Clean data in means the algorithm optimizes against real conversions, which is the foundation every profitable Meta campaign is built on.