A Facebook lead ads Salesforce integration automatically moves leads captured in Meta instant forms into Salesforce Sales Cloud. You connect them with Salesforce's free Lead Capture app, Zapier, or a third-party connector, mapping each form field to the Salesforce Lead or Contact object. The native Lead Capture app syncs in real time at no cost, while a separate Meta Conversion Leads integration sends CRM status back to Meta to optimize ad delivery. It ends manual CSV uploads, beats Meta's 90-day lead expiry, and gets sales following up faster.
A lead that sits in a CSV waiting for someone to re-upload it by hand is a lead you are slowly losing. Worse, Meta only keeps your lead data for about 90 days before deleting it, so the manual export habit is a quiet liability the moment volume picks up. Connecting Facebook lead ads to Salesforce removes the human step entirely: a form submission becomes a Salesforce record in seconds, and your sales team works the lead while it is still warm.
This guide is the deep, Salesforce-specific reference. It sits under our broader Facebook lead ads CRM integration overview, and it assumes you already know the fundamentals of Facebook lead ads. Here we go all the way into Salesforce: every connection method compared, the exact native setup steps, how to map your fields, and the part almost nobody sets up, sending lead status back to Meta to lower your cost per lead.
One thing to clear up before anything else, because it trips up almost everyone who searches this topic.
The Two Ways Facebook and Salesforce Connect
When people say "Facebook lead ads Salesforce integration," they are usually describing one of two completely different things that share the name and even share an AppExchange neighborhood. Getting these straight is half the battle.
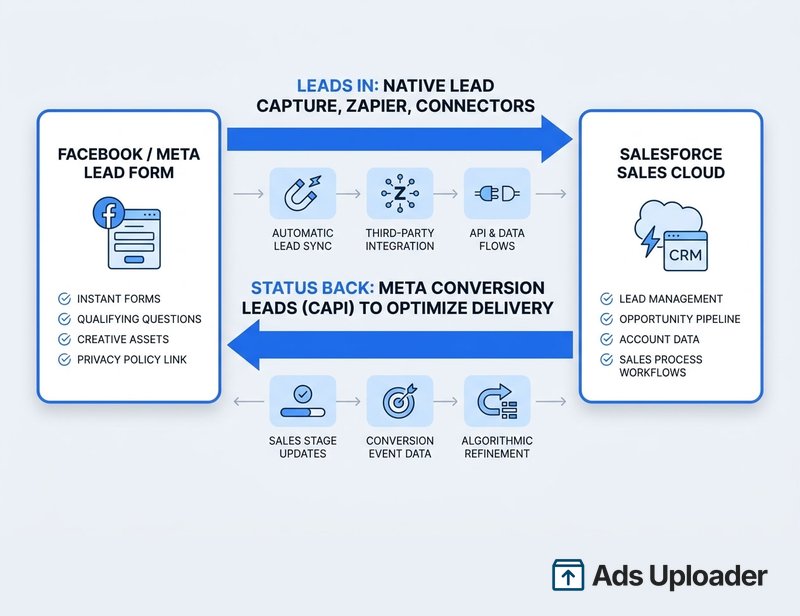
- Direction A, leads into Salesforce. A new lead submits your Meta instant form, and that record flows into Salesforce as a Lead or Contact. This is what most people want, and it is handled by the native Lead Capture app, Zapier, or a connector.
- Direction B, lead status back to Meta. Your leads are already in Salesforce, and you send their lifecycle status (qualified, won, junk) back to Meta so the algorithm can optimize for the people who actually become customers. This is a separate app, the Meta Conversion Leads integration, and it is where the real performance gains live.
Most advertisers only ever set up Direction A. Setting up both is what separates a tidy lead pipeline from a campaign that gets cheaper and higher quality over time. We will cover both, starting with getting leads in.
Your Options at a Glance
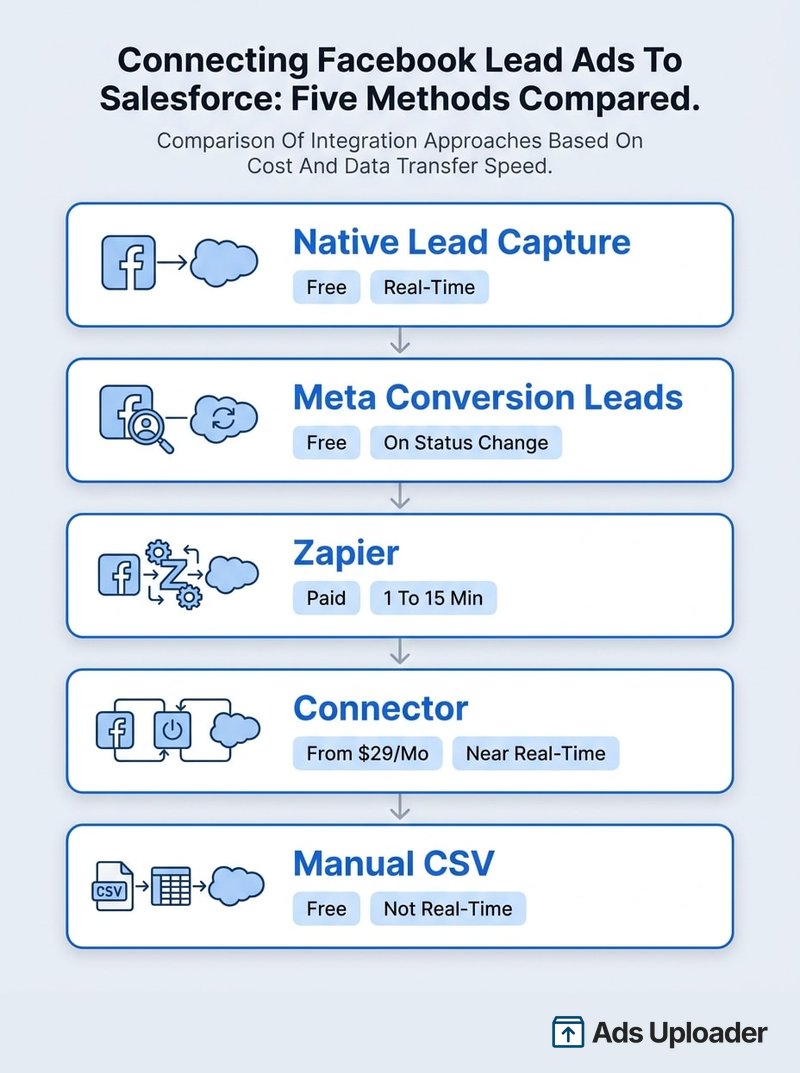
There are five practical ways to bridge the two platforms. Here is how they compare before we go deep on each.
| Method | Direction | Real-time? | Cost | Creates | Best for |
|---|---|---|---|---|---|
| Native Lead Capture | Leads in | Yes (seconds) | Free | Lead | Most advertisers wanting a free, reliable sync |
| Meta Conversion Leads | Status back | On status change | Free | (sends events) | Optimizing ad delivery for lead quality |
| Zapier | Leads in | Polling, 1 to 15 min | Paid (Premium app) | Lead, Contact, more | Contacts, filtering, cross-object logic |
| Connector (Outfunnel, etc.) | Leads in | Near real-time | From about $29/mo | Lead or Contact | UTM and ROI tracking, both objects |
| Manual CSV import | Leads in | No | Free | Lead or Contact | One-off or very low volume |
The honest default for most teams is the native app for leads in, plus the Conversion Leads app for the optimization loop. Both are free. Reach for Zapier or a connector only when you need something specific they offer.
How to Connect Facebook Lead Ads to Salesforce Natively
Salesforce publishes a free app called Lead Capture in Sales Cloud that syncs Meta lead form submissions directly into your org in real time. It maps prospects to the Lead object and requires no middleware. You can see it on the Salesforce AppExchange.
Prerequisites
- A qualifying Salesforce edition. You need Sales Cloud with API access, which means Professional edition or above (Enterprise and Unlimited included). Developer edition works for testing. Group and Essentials editions are not supported because they lack the API and Connected App access the app depends on.
- Salesforce admin access to install the app, configure the Connected App, and assign permission sets.
- Meta Business admin access to the Page running your lead ads.
- At least one live lead form on that Page.
The Setup Steps
- Install the app from the AppExchange into your Salesforce org.
- Configure the Connected App. In Setup, open Manage Connected Apps, edit Salesforce Lead Capture, and under OAuth policies set Permitted Users to "Admin approved users are pre-authorized."
- Assign the permission set. In Setup, search Permission Sets, open Salesforce Lead Capture, click Manage Assignments, and add every user who will run the integration. Admins need this too, and skipping it is a classic reason setup silently fails.
- Create the Lead Capture task. Open the App Launcher, select Lead Capture, click New Task, then the Facebook icon. Log into Facebook, pick the Page you advertise from, and choose the specific lead form. Only Pages where you have admin rights appear. Salesforce documents the full task flow in its Import Facebook Leads into Sales Cloud help article.
- Map your fields (covered in detail in the next section) and submit the task.
The Step Almost Everyone Misses
Installing the app in Salesforce is not enough. You also have to grant Salesforce permission to read your leads on the Facebook side, and this is the single most common reason a setup "completes" but no leads ever arrive.
In Meta Business Suite, go to Integrations, then Lead Access. Open the CRM tab, click Assign CRM, and choose Salesforce Lead Capture to link the app to your Page. Do this for each Page and each form you want syncing. Once it is assigned, submissions flow into Salesforce within seconds.
If you also disable ad blockers while configuring (the Lead Capture interface runs in a pop-up that strict privacy plugins can break), the native setup is genuinely a ten-minute job.
Mapping Your Form Fields to Salesforce
Field mapping is where a clean integration is won or lost. During the Lead Capture task you match each Facebook form field to a Salesforce Lead field. The standard mapping looks like this.
| Facebook form field | Salesforce Lead field | Notes |
|---|---|---|
| Full name | FirstName + LastName | The app splits a single full-name field automatically |
| Prefilled from the user's Meta profile | ||
| Phone number | Phone | Prefilled, and can be stale, so verify on the form |
| (static value) | LeadSource | Set to "Facebook Lead Ad" so reporting is clean |
| (static value) | LeadStatus | Set to "New" or your intake status |
| (static value) | Company | See the gotcha below |
| Meta Lead ID | Custom field | Store it now if you plan to use Conversion Leads later |
The Company Field Gotcha
Salesforce requires the Company field on every Lead, but consumer Facebook forms almost never collect it. If you ignore this, leads fail to create. You have two clean fixes: add a short-answer "Company" question to your instant form, or map a static default value (such as "Facebook Lead") into Lead.Company during setup. The native app lets you set static values for fields like LeadSource, Status, and Company, so a default is the painless route for B2C campaigns.
Lead Versus Contact
The native app creates Lead records only. That suits most inbound campaigns, where a cold prospect should land as a Lead and run through your normal qualification and conversion process. If your motion needs people to arrive as Contacts (common in account-based or existing-customer flows), the native app cannot do it. Use Zapier, a connector, or a post-capture Salesforce Flow instead. This Lead-versus-Contact choice is the most common reason teams outgrow the free app.
Connecting With Zapier
When you need flexibility the native app does not offer, Zapier is the usual next step. Its Facebook Lead Ads connector is a Premium app, so you need a paid Zapier plan to use it in production.
The flow is a New Lead trigger on Facebook Lead Ads (effectively instant) paired with a Salesforce action: Create Lead, Create Contact, Convert Lead, Add Lead to Campaign, or update an existing record. The flexibility is real. You can filter which leads sync (by form, location, or answer), check for duplicates, and write to objects the native app cannot touch.
The trade-off is timing and cost. While the Facebook trigger is instant, the Salesforce side runs on a polling schedule that ranges from roughly 1 to 15 minutes depending on your plan, so "real-time" is closer to "near-real-time." You also pay per task, and you configure a separate Zap for each form and object. Choose Zapier when you specifically need Contacts, filtering, or cross-object logic, not as a default.
Connectors and Manual Import
Beyond Zapier, dedicated connectors such as Outfunnel, LeadsBridge, Make, and Pabbly Connect all sync Facebook leads into Salesforce. Outfunnel starts around $29 per month, syncs to Leads or Contacts, and carries UTM and lead-source data so you can attribute campaign ROI, which the native app does not do. Pabbly Connect includes a monthly free-task allowance. These tools earn their cost when you want richer mapping, both objects, or built-in attribution. If you run a different CRM as well, the same pattern applies, and our Facebook lead ads HubSpot guide walks through that stack.
Manual CSV import is the fallback. In Ads Manager or Meta Business Suite, open your lead form and download the CSV, then import it with Salesforce's Data Import Wizard (Setup, Data Import Wizard) or the Data Loader, matching CSV columns to Lead or Contact fields. It works with no middleware, but it is not real-time and it lives or dies on someone remembering to do it. Remember the 90-day clock: Meta deletes lead data roughly 90 days after submission, so anything not exported in that window is gone. That single fact is the strongest argument for automating the sync rather than relying on exports.
Sending Lead Status Back to Meta
This is the section that pays for itself, and the one the SERP barely covers. Everything above gets leads into Salesforce. The Meta Conversion Leads integration does the reverse: it sends each lead's Salesforce status back to Meta so the auction can optimize for quality, not just volume.
It is a separate, free, no-code app, distinct from Lead Capture, and Meta walks through it in its Connect your Salesforce Sales Cloud to Meta help doc. Here is the shape of it:
- Create a dataset in Events Manager. In Meta Events Manager, connect a new data source of type CRM and create a dataset for your lead conversions. This gives you a dataset ID.
- Install the Meta Conversion Leads app for Sales Cloud from the AppExchange.
- Assign the permission set. Give users the Meta Conversion Leads Users permission set.
- Store the Meta Lead ID. Each lead record must hold the Facebook Lead ID (sometimes labeled Meta Lead ID). If you mapped it during native Lead Capture setup, you already have it.
- Connect Salesforce to Meta. In the app, link your Business Manager and the dataset, then map the Lead ID and contact fields that get sent.
Once connected, changing a lead's status in Salesforce (to Qualified, Won, or Disqualified) sends an event back to Meta over the Conversions API. Meta then uses the Maximize number of conversion leads goal to chase people who resemble your best closed leads. Meta reports advertisers using Conversions API for CRM with this goal see on average 21% lower cost per quality lead versus optimizing for raw lead volume.
For the feedback to be useful, be deliberate about which statuses you send. Meta learns from the signal you give it, so a meaningful "qualified" or "won" event is worth far more than firing a conversion the moment a lead is created. Map your real sales milestones: send the event when a rep marks the lead Qualified, or when it converts to an Opportunity, not at intake. The cleaner the definition of a good lead in Salesforce, the better Meta optimizes toward people who match it. Garbage statuses in means noisy optimization out, so this is one place where disciplined CRM hygiene directly lowers ad cost.
One date to plan around: starting April 2026, the conversion leads goal requires a server-side CRM connection (the Conversions API, which this integration provides) for new campaigns, with existing campaigns required to migrate by August 2026. If lead quality is your priority, this integration is no longer optional. For the full picture on connecting any CRM, the broader CRM integration overview linked earlier is the place to go next.
Troubleshooting Common Sync Problems
When leads stop arriving, work through these in order.
- Leads not importing at all. First check the Facebook side: Meta Business Suite, Integrations, Lead Access, CRM tab, and confirm Salesforce Lead Capture is still assigned to the correct Page. This is the number-one culprit.
- Setup completes but nothing syncs. Verify the user has the Salesforce Lead Capture permission set (admins included), and that the Connected App still shows "Admin approved users are pre-authorized." Re-authenticate if a password or token changed.
- The Lead Capture screen will not load. Disable ad blockers and allow pop-ups, then retry in a standard browser.
- Leads create then vanish. A Salesforce duplicate or assignment rule may be merging or rerouting them. Review your duplicate rules so Facebook leads are not silently absorbed into existing records.
- Leads rejected on creation. Almost always the missing Company field. Add a static default or a form question.
- Consent and privacy. Map any opt-in checkbox from your form to a custom consent field on the Lead so you record agreement, and keep your storage in line with GDPR and your retention policy.
Wrapping Up
Connecting Facebook lead ads to Salesforce is not one task, it is a choice of direction. For leads coming in, the native Lead Capture app is free, real-time, and enough for most teams, with Zapier and connectors waiting for when you need Contacts, filtering, or attribution. For performance going out, the Meta Conversion Leads integration sends Salesforce status back to Meta and, per Meta's own data, averages 21% lower cost per quality lead.
Set up the native sync first, map your fields carefully (mind the Company field and store the Meta Lead ID), grant CRM access on the Facebook side, and confirm a test lead lands. Then add the Conversion Leads loop so your campaigns get smarter as your sales team works the pipeline. With the April 2026 conversion-leads rule now in force, the optimization side is the difference between a Salesforce integration that just files leads and one that actively lowers what each good lead costs you.
