Configure Your Ads
After you upload your media, the Ad Configuration panel tells Ads Uploader how to build the new ads. The fastest way is to pick an ad that already runs in your account. We call it the source ad: Ads Uploader copies its campaign, ad set, targeting, page and text settings onto your new ads, so you only change what needs to be different.
This page walks through the panel from top to bottom. When everything looks right, go to Launch Your Ads.
Choose a Configuration Method
The Configuration Method section at the top of the panel offers these options:
| Option | When to use it |
|---|---|
| Select a Meta Ad to Copy Settings From (Most Popular) | You want to copy an existing ad. This is the method this page describes. |
| Select a saved API preset | You saved a source ad as a preset before. Only shown once you have one. |
| Upload Ad Configuration XLSX | You prefer Meta's bulk import spreadsheet. See XLSX Configuration. Hidden when Hide XLSX Configuration is on in User Defaults. |
| Select a saved XLSX preset | You saved an XLSX file as a preset before. Only shown once you have one, and hidden with the XLSX option. |
You can also resume a saved build, which restores every choice on this page at once.
Pick a Source Ad
Tick Select a Meta Ad to Copy Settings From. The Select Ad from Facebook selector shows your ad account in three columns:
- Campaigns on the left
- Ad Sets in the middle, for the campaign you clicked
- Ads on the right, for the ad set you clicked
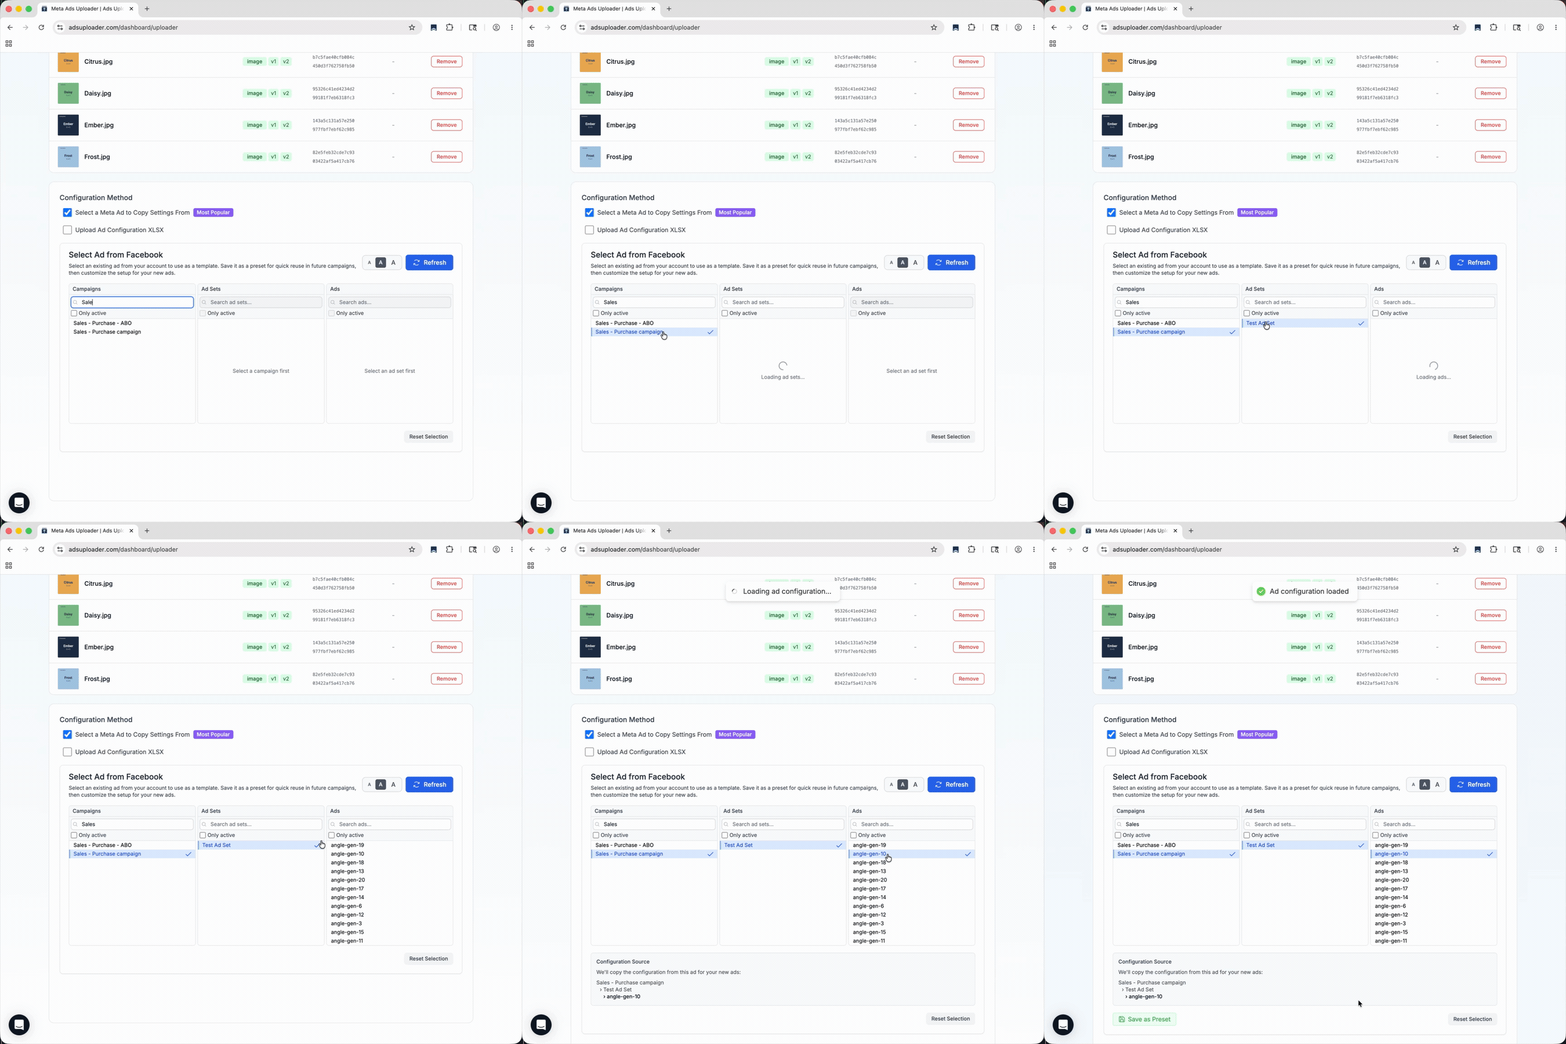
Click through the columns to reach the ad you want to copy.
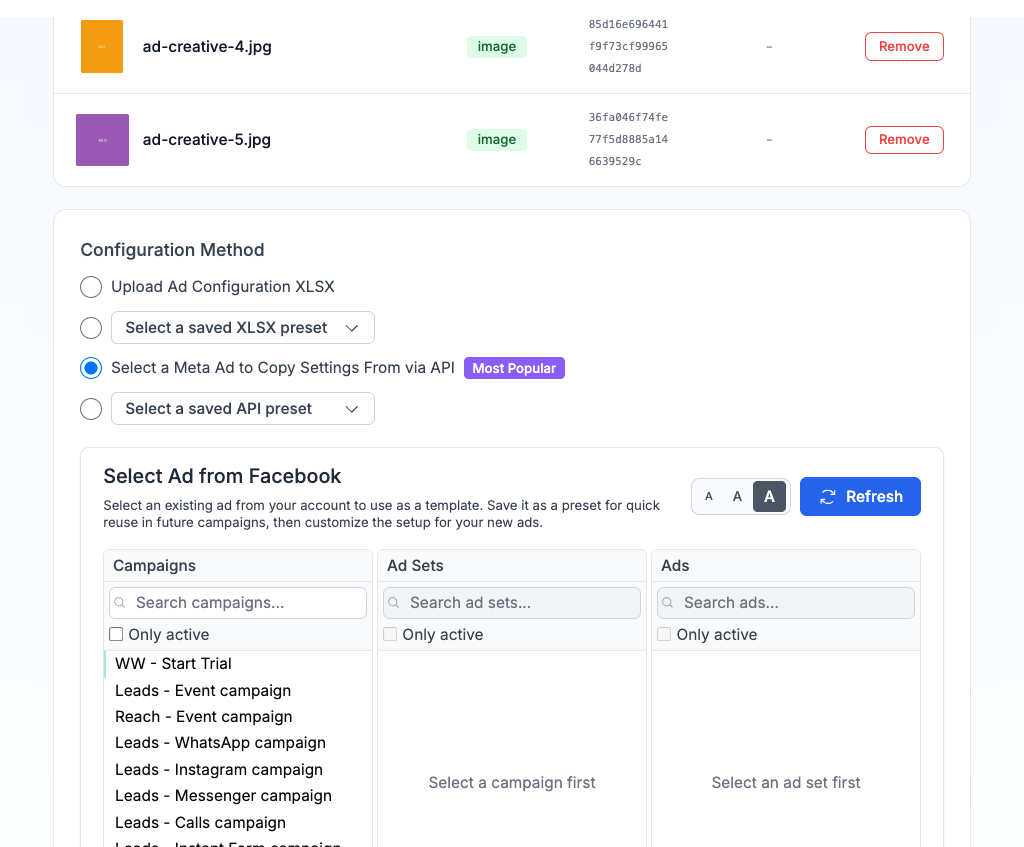
Tools that help you find the right ad:
- Search box at the top of each column filters by name. In the Campaigns column, press Enter to search your whole account.
- Only active under each search box hides paused items.
- The A A A buttons in the selector header change the text size in all three columns.
- Refresh in the selector header reloads your campaigns from Meta, for example after you create a new ad in Ads Manager.
After you click an ad, the Configuration Source box confirms the campaign, ad set and ad you picked. From there you can click Save as Preset to reuse this source ad later, or Reset Selection to start again.
Ads You Cannot Use as a Source
Some ads do not contain settings that can be copied. If you pick one, the box turns red and shows Invalid Ad Selected:
- Ads made from an existing post ID. They do not carry a full creative. Pick the original ad instead, or use the Duplicator if you want to keep the post and its engagement.
- Catalog or collection ads with no link. Their content is dynamic, so there is nothing to copy.
- Ads whose creative could not be loaded. Try again, or pick a different ad.
Set Up Campaigns and Ad Sets
By default your new ads go into the same campaign and ad set as the source ad. Leave every option in this section unticked if that is what you want. Tick an option only when you want something new.
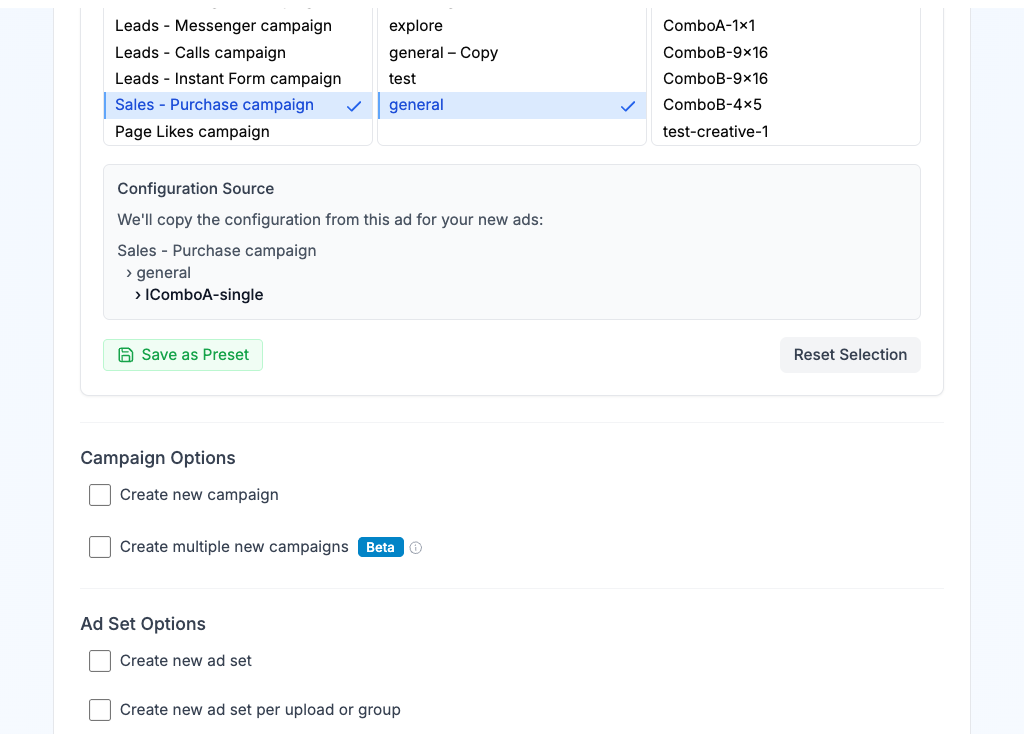
Campaign Options
| Option | What it does |
|---|---|
| Create new campaign | Creates one new campaign with the source campaign's settings. Type a name, or leave it empty to use the suggested name. |
| Create multiple new campaigns | Creates two or more new campaigns. Use + to add a campaign row. |
When you create multiple campaigns, a toggle appears next to the option:
- Split Creatives spreads your ads across the campaigns, so each campaign gets a different share.
- Duplicate Creatives puts every ad into every campaign.
Campaign names accept {date} and {date:short} placeholders, and {index} when you create multiple campaigns. See Ad Naming Patterns.
Ad Set Options
| Option | What it does |
|---|---|
| Create new ad set | Puts all ads into one new ad set with a name you choose. |
| Create new ad set per upload or group | Creates one ad set per file, or per group of variations when Group variations is on. |
| Auto-divide ads into ad sets | Splits your ads into ad sets of a fixed size, for example 5 ads per ad set. |
| Build custom ad set configuration | Opens a window where you decide which media goes into which ad set. |
New ad sets copy the source ad set's settings, including its targeting and placements. See Ad Grouping for how each mode names and groups your ads.
If you turned on Enable Split Destination Testing in your defaults, a Single Destination / Split Destination toggle also appears here. See Split Destination.
Budgets and Spend Limits
New ad sets inherit the source ad set's budget. To change it, type a new amount in the Daily Budget field that appears under the ad set option. If the source ad set uses a bid control, a Bid Cap, Cost Per Result Goal, Target Cost or ROAS Goal field appears too. The source value is shown in grey, and leaving a field empty keeps it. With more than one new ad set, the amount applies to each ad set.
If the source campaign uses Advantage campaign budget (CBO), the budget lives on the campaign instead:
- When you create a new campaign, a Campaign Daily Budget or Campaign Lifetime Budget field appears under the campaign name. Leave it empty to copy the source amount.
- The ad set budget field is replaced by optional Min Spend and Max Spend limits for each ad set.
- A toggle next to the limits switches between fixed amounts in your currency and a percentage of the campaign budget (in 5% steps). Percentages also work when you add ad sets to an existing CBO campaign.
- Click the X next to a limit to remove a limit that the source ad set had.
Audience Targeting
New ad sets use the source ad set's full audience. To change countries, cities, postcodes, age, gender or detailed targeting, turn on Show Ad Set Targeting in Account > Defaults > General. An Edit Ad Set Targeting button then appears next to the ad set option you ticked. See Ad Set Targeting.
Ad Names and Preview
Under Ad Name Options, tick Use custom ad name pattern to build ad names from your file names. See Ad Naming Patterns.
The preview table below shows the exact structure that will be created: campaign, ad set and ad name for every ad. Check it before you move on.
Choose the Page and Profiles
Profile Options sets the Facebook Page and Instagram account your ads run from. They start with the profiles from your source ad.
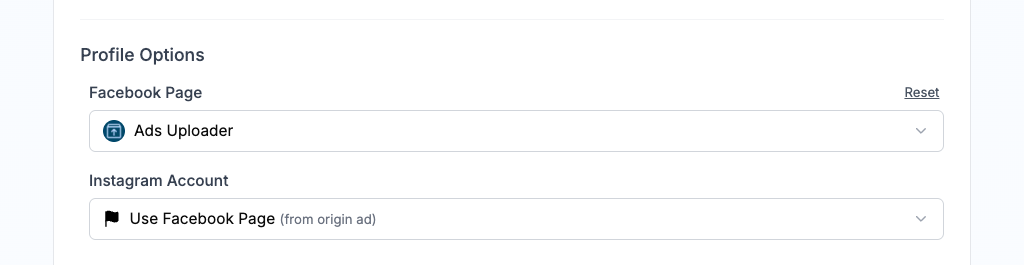
| Setting | What it does |
|---|---|
| Facebook Page | The page your ads are published under. |
| Instagram Account | The Instagram account used for Instagram placements. Choose Use Facebook Page to run Instagram placements from your page instead. |
| Threads Profile | Only shown when the source ad has a Threads profile. Set it to None if you do not want the new ads to use it. |
Click Reset to go back to the source ad's profiles. When you create multiple campaigns, each campaign gets its own set of selectors.
To use different profiles for individual ad sets or ads, open the per-ad-set or per-ad editor in Ad Texts & Settings. Rows you do not change keep the shared profile.
Profile Options is on by default. It is hidden when:
- you turn off Show Profile Options in Account > Defaults > General,
- the source ad uses an Instant Form (lead form), or
- you use the XLSX method.
Partnership Ads always show it.
Partnership Ads with Your Own Media
A partnership ad runs under two identities, usually your brand and a creator. The toggle at the top of Profile Options switches between Standard Ads and Partnership Ads.
- Click Partnership Ads.
- Choose the First Identity (your brand) and the Second Identity (the approved partner).
- Under Identities To Display In The Header, pick Both identities in the header, First identity only in the header or Dynamic identity optimization. This choice applies to the whole launch.
If the app asks you to reconnect Facebook for partnership permissions, do that before you choose partners. The creator must also give your brand permission to advertise with them; reconnecting your own account does not grant that.
For uploaded files, you can pick a different partner for each ad or ad set in the per-ad or per-ad-set editor. Choose No Partner on a row to make that ad a standard ad, or Reset to go back to the shared partner.
Import an Existing Instagram Post
You can also boost a creator's existing Instagram post as a partnership ad:
- In the media toolbar, click the link icon (Import by Link).
- Turn on Partnership Ads Mode and use Import by Ad Code or URL.
- Paste an Instagram partnership ad code, a post URL or a media Post ID, one per row. Ad names are optional.
A URL or Post ID only works if you already have partnership advertising permission for that post. Facebook post imports are not supported at the moment.
The post fixes the creator shown under Partner Identity. Choose your brand under Your Identity. The header options here are Both identities in the header, Partner identity only in the header and Dynamic identity optimization. Imported posts keep their original caption and cannot be mixed with uploaded files in the same batch.
Partnership Ads from the CLI or MCP
The CLI and MCP can launch the same uploaded-media partnership ads. Add profile.partnership.enabled: true and the partner IDs to your spec, and you can set partners per ad or per ad set. The full spec, with examples, is in the CLI Reference.
Write Your Ad Text
The Ad Texts & Settings section decides what your ads say and where they link to.
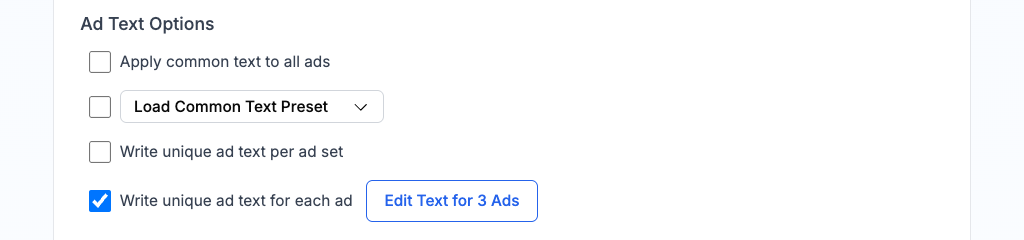
Pick a Text Mode
| Mode | When to use it |
|---|---|
| Apply common text to all ads | Every ad shares the same text. The fastest setup. |
| Load Common Text Preset | Fill the common text from a saved text preset. Only shown once you have one. |
| Write unique ad text per ad set | Each ad set gets its own text. Click Edit for N Ad Sets to open the table. |
| Write unique ad text for each ad | Each ad gets its own text, with a thumbnail of its media for reference. Click Edit for N Ads to open the table. |
In the tables, the Columns menu shows or hides fields such as Link Description, Call to Action, Website URL and Display URL.
Fill in the Fields
| Field | What it does |
|---|---|
| Headlines | The headline. Click + to add more. |
| Primary Texts | The main text above the media. Click + to add more. |
| Link Descriptions | The short text under the headline. Click + to add more. |
| Call to Action | The button, such as Learn More or Shop Now. |
| Website URL | Where people go when they click. |
| Display URL | The short link shown on the ad, such as example.com. |
| URL Parameters | UTM tags added to the link. Only shown when Show URL Parameters is on in your defaults. |
Each field starts with the source ad's text, shown in grey. If you leave a field empty, the new ads keep the source text. To edit the source text instead of typing from scratch, click the small arrow at the right of the field.
You can add up to 5 headlines, primary texts and link descriptions. If the source ad already has more, Ads Uploader keeps them, up to 10 per field.
Flexible Texts or Separate Ads
Once you have two or more headlines, primary texts or descriptions, a toggle appears:
- Flexible Texts: one ad carries all your text options, and Meta tests the combinations for you. Results are reported per ad.
- Separate Ads: Ads Uploader creates one ad for each text combination, so you can compare each version in your reports. The ad names get suffixes such as
_H1_P2, which you can change in User Defaults.
The XLSX method only supports Separate Ads.
Save or Reset Your Text
Click Save as Preset below the fields to save this text for later. Click Reset All to go back to the source ad's text. See Presets for what a text preset stores.
Choose Creative Enhancements
Creative Enhancements controls Meta's Advantage+ creative features, which let Meta adjust your creative automatically (for example, adding music or improving brightness). Each checkbox starts with the source ad's setting. Tick Select All to turn every option on, or untick it to clear them all.
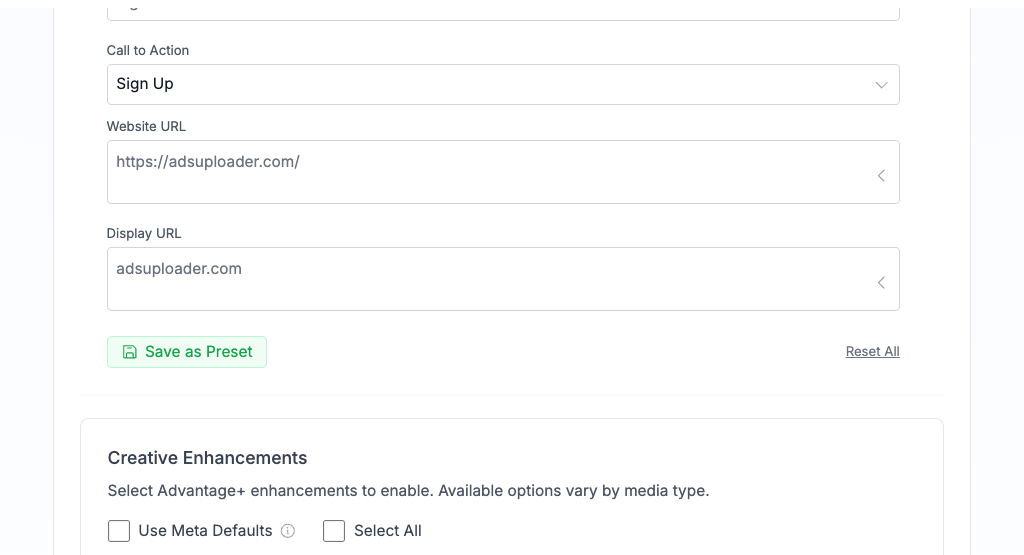
The options are listed in three columns, by media type:
| Enhancement | Images | Videos | Carousel |
|---|---|---|---|
| Add music | Yes | Yes | Yes |
| Add overlays | Yes | ||
| Add video effects | Yes | ||
| Adjust brightness and contrast | Yes | ||
| Carousel to video | Yes | ||
| Dynamic description | Yes | ||
| Enhance CTA | Yes | Yes | Yes |
| Flex media | Yes | Yes | |
| Image animation | Yes | ||
| Optimize card order | Yes | ||
| Relevant comments | Yes | Yes | Yes |
| Reveal details over time | Yes | Yes | |
| Show end card | Yes | ||
| Show spotlights | Yes | Yes | |
| Text improvements | Yes | Yes | |
| Translate text | Yes | Yes | |
| Visual touch-ups | Yes | Yes | Yes |
Add overlays and Image animation only appear when the source ad already uses them.
Enhancements That Need a Catalog
These options only appear when the source ad uses a product catalog:
| Enhancement | Images | Videos |
|---|---|---|
| Adapt to placement | Yes | Yes |
| Add dynamic overlays | Yes | |
| Dynamic descriptions | Yes | Yes |
| Product tags | Yes | Yes |
| Show products | Yes | Yes |
Product tags only appears when the source ad has tagged products. Leave it ticked to copy every tagged product and its position to the new ads, or untick it to launch without the tags.
Disclose AI-Generated Content
The AI Transparency panel lets you tell Meta that your creative was made or significantly edited with AI. Tick AI-generated content to add the disclosure. It is off by default, but if the source ad already carries a disclosure, it is carried over. You can also set it per ad or per ad set in the text tables.
Next Step
Your ads are configured. Continue to Launch Your Ads to choose publication options and create them.