Launching Ads
This is the existing-ad configuration approach: you pick an ad that's already live in your account as the model, and Ads Uploader copies its setup onto your new ads, then creates them in real time with full control over creative enhancements and flexible text.
Overview
This method:
- Reads the model ad's setup straight from your Meta account
- Allows browsing and selecting existing ads as templates
- Creates ads immediately in your account
- Provides full control over all ad settings
- Supports multiple headlines and descriptions
Step 1: Select Source Ad
Three-Column Navigation
The ad selector presents your account structure in three columns:
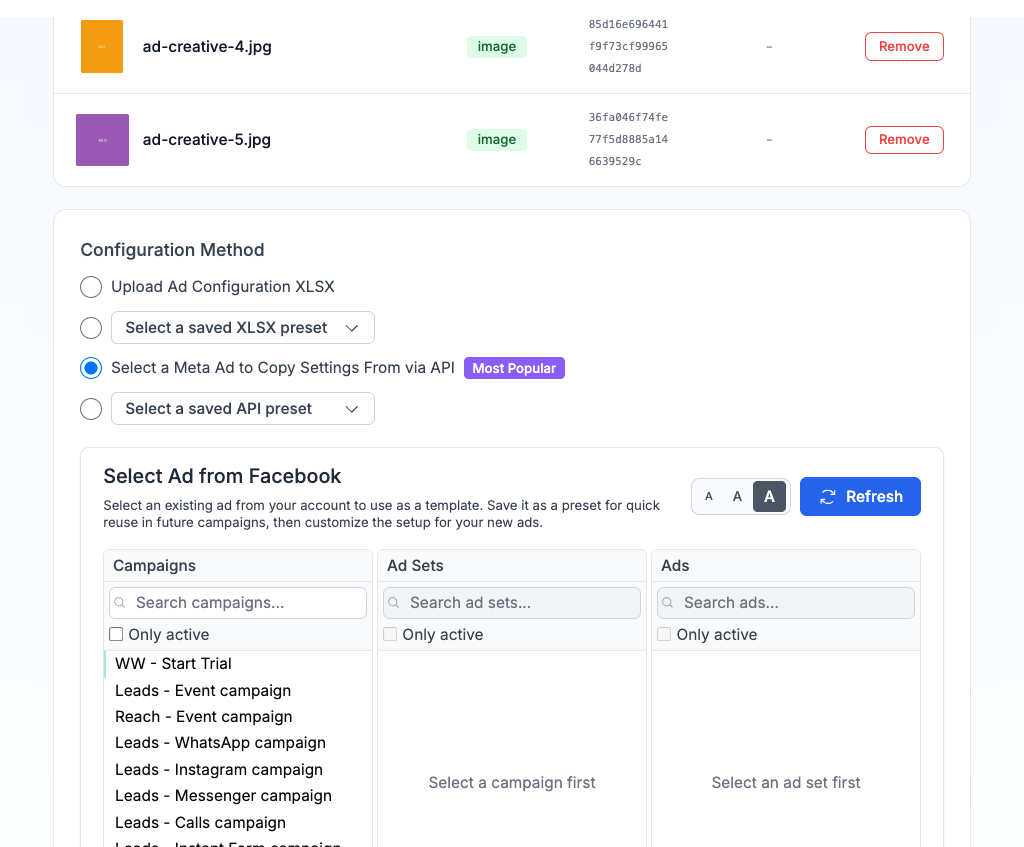
- Campaigns (Left) - Shows all campaigns in your account
- Ad Sets (Middle) - Displays ad sets for the selected campaign
- Ads (Right) - Lists ads in the selected ad set
Click through each column to drill down to the ad you want to use as a template.
Finding the Right Ad
Each column has filter options:
- Search box: Type to filter by name
- Only active: Toggle to show/hide paused items
- Text size buttons (A A A): Adjust text size in the selector
After selecting an ad, a Configuration Source box confirms your selection showing the campaign, ad set, and ad name. You can Save as Preset for quick reuse or Reset Selection to start over.
Step 2: Configure Campaign Structure
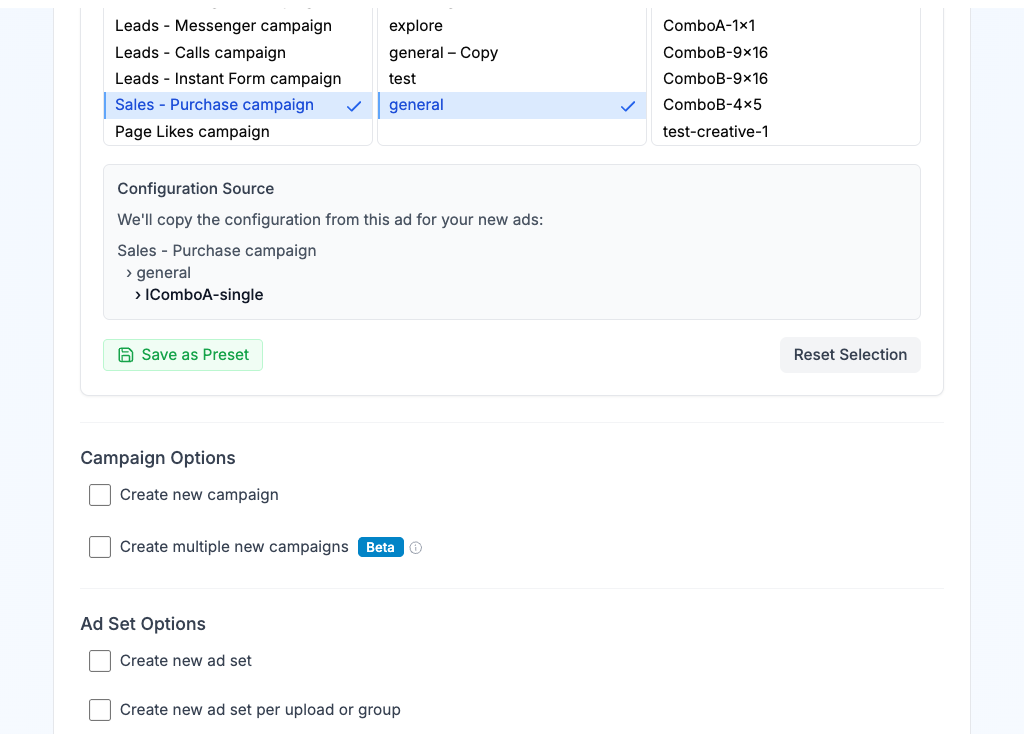
Campaign Options
| Option | Description |
|---|---|
| Use existing campaign (default) | Adds new ads to the selected campaign |
| Create new campaign | Generates a new campaign with a custom name |
| Create multiple new campaigns | Split or duplicate ads across multiple campaigns |
Ad Set Options
| Option | Description |
|---|---|
| Use existing ad set (default) | All ads go into the selected ad set |
| Create new ad set | Creates a single new ad set with a custom name |
| Create new ad set per upload or group | Creates individual ad sets per file or variation group |
| Auto-divide ads into ad sets | Splits uploads into ad sets by a fixed count |
| Build custom ad set configuration | Manually assign uploads to specific ad sets |
See Ad Grouping for details on organizing uploads into ad sets.
Budgets and Spend Limits
New ad sets inherit the source ad set's budget by default. You can override the daily budget (and bid amount, where the bid strategy uses one) in Ad Set Options.
If the source campaign uses Advantage campaign budget (CBO), the budget lives on the campaign instead. When you create a new campaign from a CBO source, a Campaign Daily Budget or Campaign Lifetime Budget field appears under the campaign name; the source amount is shown as a placeholder, and leaving it empty inherits it. Under CBO, the ad set daily budget field is replaced by optional Min Spend and Max Spend limits per ad set. Bid Cap, Cost Per Result Goal, Target Cost, or ROAS Goal remains available when the source bidding strategy uses that control. A toggle switches between fixed currency amounts and a percentage of the campaign budget (5% steps); percentage limits also work when adding ad sets to an existing CBO campaign. Use the X beside a field to remove a limit inherited from the source ad set.
Audience Targeting
New ad sets inherit the source ad set's full audience. To override countries, cities, zip or post codes, age range, gender, or detailed targeting for the new ad sets, enable Show Ad Set Targeting in Account > Defaults, then use the Edit Ad Set Targeting button in Ad Set Options. When the build creates more than one ad set, each one can override the shared default individually. Anything you don't override keeps inheriting from the source. See Ad Set Targeting for the full guide.
Preview Table
A preview table shows the exact campaign structure that will be created, including Campaign ID/Name, Ad Set ID/Name, and Ad Name for every ad.
Step 3: Configure Profile
Profile Options
Select which Facebook Page and Instagram Account your ads will post from. Profile Options is shown by default; you can hide it in Account > Defaults.
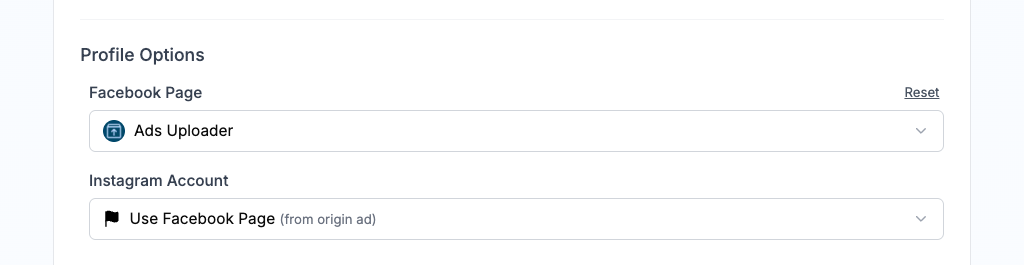
| Setting | Description |
|---|---|
| Facebook Page | The page your ads will be published under |
| Instagram Account | The Instagram account for Instagram placements (can use "Use Facebook Page" for default) |
These default to the profiles from your source ad. Use the Reset link to restore the original values.
For standard uploads, the per-ad-set and per-ad editors in Ad Texts & Settings also let you choose different profiles for individual ad sets or ads. A Threads Profile selector appears when your source ad or preset includes one. For uploaded media in Partnership Ads mode, the Second Identity column lets you select an approved partner for each ad or ad set. Actor profiles and partners can be changed independently. Untouched rows inherit the shared or campaign partner; No Partner removes it from a row, and Reset restores the shared choice. The ad header display setting stays shared across the launch. Posts imported using an ad code or Instagram URL keep their fixed creator identity and do not offer per-row profile or partner overrides.
Partnership ads with your own media
The CLI and MCP can launch uploaded-media partnership ads on Facebook and Instagram. Use your normal image/video media, carousel, flexible, Multi Media, or placement-variant spec and add profile.partnership.enabled: true. Uploaded media follows ordinary assembly with a Second Identity. Omit uploaderMode or set it to false; true selects imported posts and cannot be used with uploads.
Choose your First Identity with profile.pageId and profile.instagramId. The shared partner is the Second Identity:
For videos, mediaItems[].mediaId must be the numeric Facebook video ID: use the upload response’s videoId, not its internal id. videoId is accepted as an alias, and linkedAssets[] follow the same rule. Internal upload IDs are resolved on save only when they belong to the authenticated user and selected account. Without a numeric ID or a batch link, an unresolved video makes the build unlaunchable. See the canonical placement-video item.
{
  "accountId": "act_123",
  "copyFromAd": "SOURCE_AD_ID",
  "adSet": { "id": "EXISTING_AD_SET_ID" },
  "mediaItems": [
    { "mediaName": "one.jpg", "mediaType": "image", "mediaHash": "UPLOADED_IMAGE_HASH_ONE" },
    { "mediaName": "two.jpg", "mediaType": "image", "mediaHash": "UPLOADED_IMAGE_HASH_TWO" }
  ],
  "profile": {
    "pageId": "111",
    "instagramId": "222",
    "partnership": {
      "enabled": true,
      "sponsorPageId": "333",
      "sponsorInstagramId": "444",
      "displayMode": "both"
    }
  },
  "options": { "status": "PAUSED" }
}
For different partners per ad, add this texts block to the same spec. The second row explicitly uses No Partner:
{
  "texts": {
    "mode": "perAd",
    "perAd": {
      "one.jpg": { "sponsorPageId": "555", "sponsorInstagramId": "666" },
      "two.jpg": { "sponsorPageId": null, "sponsorInstagramId": null }
    }
  }
}
For ad-set scopes, use texts.mode: "perAdset" and texts.perAdset, keyed by the final ad-set name/ID or campaign::key. In multi-campaign launches, use profile.campaigns[<id or unambiguous name>] for campaign sponsor overrides. Resolution is shared partner, then campaign, then the active row. Omitted sponsor fields inherit independently; explicitly set both IDs to null for No Partner. Switching only the partner Page does not clear an inherited Instagram ID on uploaded media; set that ID explicitly when changing the pair. Row First Identity fields (pageId, instagramId, threadsId) remain independent.
For an Instagram-only Second Identity, set sponsorPageId: null, sponsorInstagramId to the approved account ID, and sponsorPageUseInstagramAccount: true. A partner Facebook Page is also supported for uploaded media. The restriction on Facebook post imports does not apply to uploaded media.
displayMode applies across the launch: both (default), first, or dynamic. Each effective partner must differ from the First Identity and have approved partnership advertising access. Pending or missing approval is refused with the identity named. Every row needs a complete inherited or explicit partner, or an explicit No Partner override. Enabling partnerships without any sponsor is refused. Approval is rechecked at preview and create; a saved build does not store permission grants.
ads create:preview and ads_preview show each ad's effective partner, approval and header mode, grouped by ad set. Admin-only ads create:test or ads_create with options.testMode: true validates eligible calls with Meta without creating ads and reports passed, failed and not-checked counts. Complete web-saved uploaded-media partnership builds can launch through the CLI and MCP; builds edited through these tools restore Partnership Ads, identities, row partners and header mode in the web uploader.
Partnership ads with uploaded media
In Profile Options, switch from Standard Ads to Partnership Ads. Choose the First Identity and Second Identity, then select Both identities in the header, First identity only in the header, or Dynamic identity optimization. The header choice applies across the launch. If the app asks you to reconnect Facebook for partnership permissions, complete that permission step before selecting partners. The creator must also grant advertising permission; reconnecting your account alone does not grant access to their content.
For uploaded files, you can choose different actors and partners in the per-ad or per-ad-set editor. This uploaded-media partnership workflow is available in the web uploader, the CLI and MCP. An approved-partner identity selector is different from a browser of approved posts; the uploader has no approved-post browser.
Import an existing Instagram post
Click Import by Link, enable Partnership Ads Mode, and use Import by Ad Code or URL. Paste an Instagram partnership ad code, an Instagram post URL, or an Instagram media Post ID, one per row. Optional ad names help identify the rows. A URL or Post ID needs the relevant partnership advertising permission; the paid-partnership label alone does not guarantee permission to boost. A valid code can authorize its associated post. Facebook imports are currently unsupported; Facebook support is under evaluation.
The imported post fixes the creator identity shown under Partner Identity. Choose your sponsoring brand under Your Identity; importing does not replace your selected brand Instagram account. The header choices are Both identities in the header, Partner identity only in the header, and Dynamic identity optimization. Here the second choice means creator-only, not brand-only. Resolve any brand-mismatch warning by selecting the brand authorized for that code or obtaining a matching code.
Use the imported-post Ad Texts & Settings panel for a headline, CTA, website URL, URL parameters and testimonial. Use AI Transparency for AI disclosure. Multi-advertiser enrollment is inherited; the web panel does not expose a separate toggle. Apply common text or edit each imported ad separately; the original organic caption stays unchanged. The creator's profiles cannot be overridden per row. Imported posts cannot be mixed with uploaded files in the same batch. Removing a row removes it from this build; switching partnership import mode off asks you to clear imported rows.
Step 4: Configure Ad Text
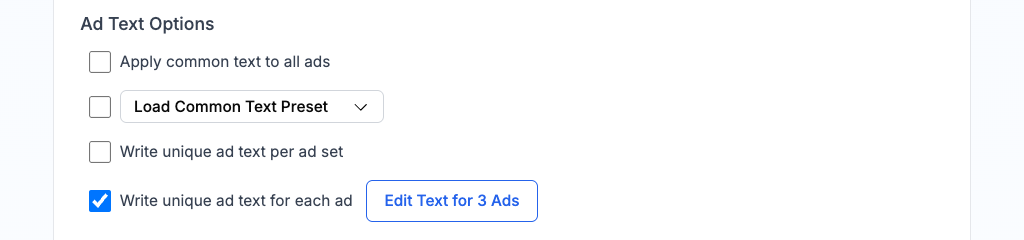
Text Mode Options
| Mode | Description |
|---|---|
| Apply common text to all ads | Same text shared across all ads. Fastest setup. |
| Write unique ad text per ad set | Different text for each ad set group. Opens editing table. |
| Write unique ad text for each ad | Complete control over individual ads with media thumbnails for reference. |
You can also load a saved Common Text Preset to quickly apply previously saved text configurations.
Text Fields
| Field | Description |
|---|---|
| Headlines | Ad headline text. Add multiple with the + button (up to 5). |
| Primary Texts | Main ad body text. Add multiple with the + button (up to 5). |
| Link Description | Description shown below the headline |
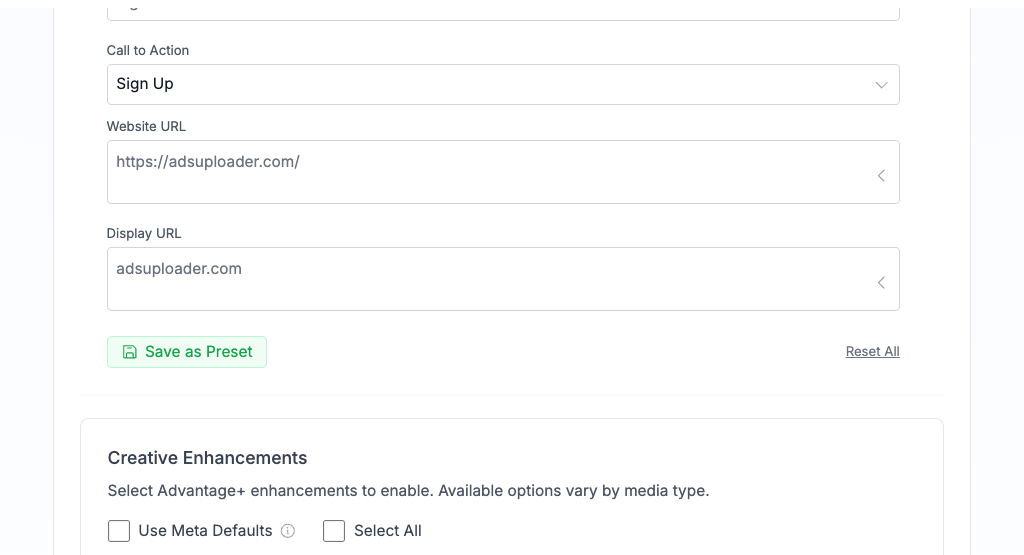
| Call to Action | Button text (Learn More, Shop Now, Sign Up, etc.) |
| Website URL | Destination link when users click the ad |
| Display URL | Shortened URL shown on the ad (e.g., adsuploader.com) |
Text fields are pre-filled from your source ad. Click the pencil icon to edit the original text, or type new text to override it.
Flexible vs. Separate Text Strategy
Flexible Texts (Recommended):
- Meta automatically tests combinations of your headlines, texts, and descriptions
- Performance tracked at ad level
Separate Ads:
- Creates individual ad for each text combination
- Detailed reporting per text variant
Toggle between strategies using the switch above your text inputs.
Save as Preset
Click Save as Preset below the text fields to save your text configuration for reuse. Click Reset All to restore the original text from the source ad.
Step 5: Creative Enhancements
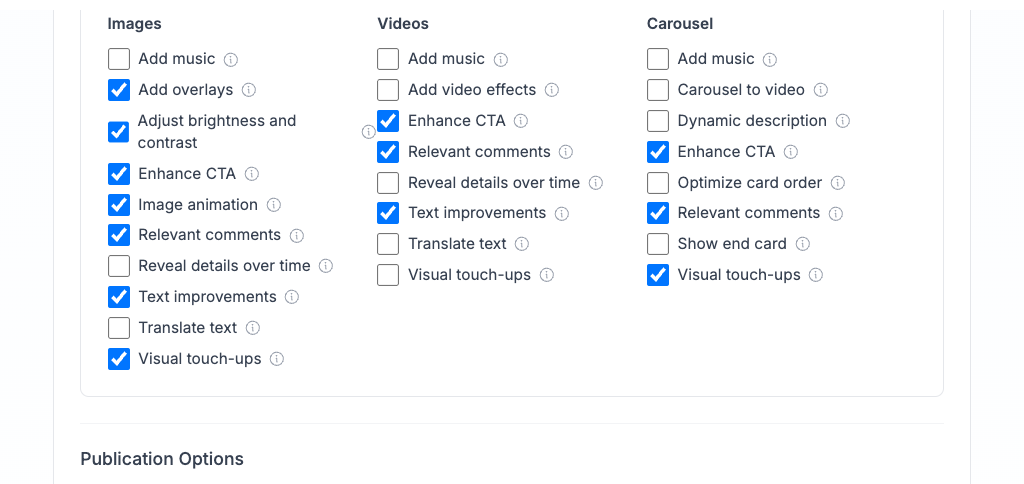
Control Meta's Advantage+ automatic optimizations for your ads. Checkboxes reflect the current settings from your source ad and can be toggled individually. Unchecked enhancements are sent as explicit opt-outs when Meta requires a complete enhancement spec.
Quick Controls
| Control | Description |
|---|---|
| Select All | Enable all available enhancements. Uncheck it to clear all selected enhancements. |
Available Enhancements
Enhancements are organized by media type. Available options vary:
| Enhancement | Images | Videos | Carousel |
|---|---|---|---|
| Add music | Yes | Yes | Yes |
| Add overlays | Yes | - | - |
| Add video effects | - | Yes | - |
| Adjust brightness and contrast | Yes | - | - |
| Carousel to video | - | - | Yes |
| Dynamic description | - | - | Yes |
| Enhance CTA | Yes | Yes | Yes |
| Flex media | Yes | Yes | - |
| Image animation | Yes | - | - |
| Optimize card order | - | - | Yes |
| Product tags from source | Yes | Yes | - |
| Relevant comments | Yes | Yes | Yes |
| Reveal details over time | Yes | Yes | - |
| Show end card | - | - | Yes |
| Show spotlights | Yes | Yes | - |
| Text improvements | Yes | Yes | - |
| Translate text | Yes | Yes | - |
| Visual touch-ups | Yes | Yes | Yes |
Product tags appear only when the selected source ad has a catalog and explicit positioned product tags. The option works for both image and video ads. Leave it selected to copy every tagged product and its position to the new ads, or clear it to create the ads without those tags.
AI-Generated Content Disclosure
The AI Transparency panel lets you self-disclose AI-generated creative content to Meta. It is off by default. When you copy settings from an ad that already carries a disclosure, the setting is carried over; you can still change it per ad or per ad set before launch.
Step 6: Publication Options
| Option | Description |
|---|---|
| Create ads in paused status | Ads are created but won't run until you manually activate them in Meta Ads Manager |
| Schedule these ads | Set a start date and time, and optionally an end time. Works when creating new ad sets and when adding ads to an existing ad set. |
| Test Mode | Admin-only. Shows the planned calls and validates eligible requests with Meta without creating ads. Reports passed, failed and not checked. |
Test Mode uses Meta validate_only. Requests needing simulated parent or creative IDs are not checked; timeouts and rate limits are not passes. It can save launch records and encrypted partnership codes, but creates no Meta objects. Validation does not confirm delivery, policy approval or appearance.
Scheduling Details
- Times use your ad account's timezone, and the start time must be at least 15 minutes in the future.
- Scheduled ads are created paused and go live automatically at the start time. If you set an end time, they stop then.
- The same schedule applies to every ad in the batch.
Step 7: Create Ads
- Click "Create Ads" button
- Confirm settings in the confirmation popup
- Monitor progress in the real-time progress panel
If you need to abort a running job, use the Stop button in the progress panel. Ads that were already submitted to Meta will still be created; the rest of the batch is skipped.